Developer Support
Set Up Your App Pricing
12 min read
·
Last updated on Jan 23, 2023
There are several ways to earn revenue from your app, each with its own benefits. This guide walks you through the options and tells you how to set them up.
Important:
Before you set up your app pricing make sure you've read and understood the Partner Agreement, particularly Section 9: Pricing, Collection and Revenue Sharing.
1. Choose a business model
Go to Pricing in the Wix Developers Center under Market Listing and choose a business model that works best for your app. You can change this later on if you want to try a different approach.
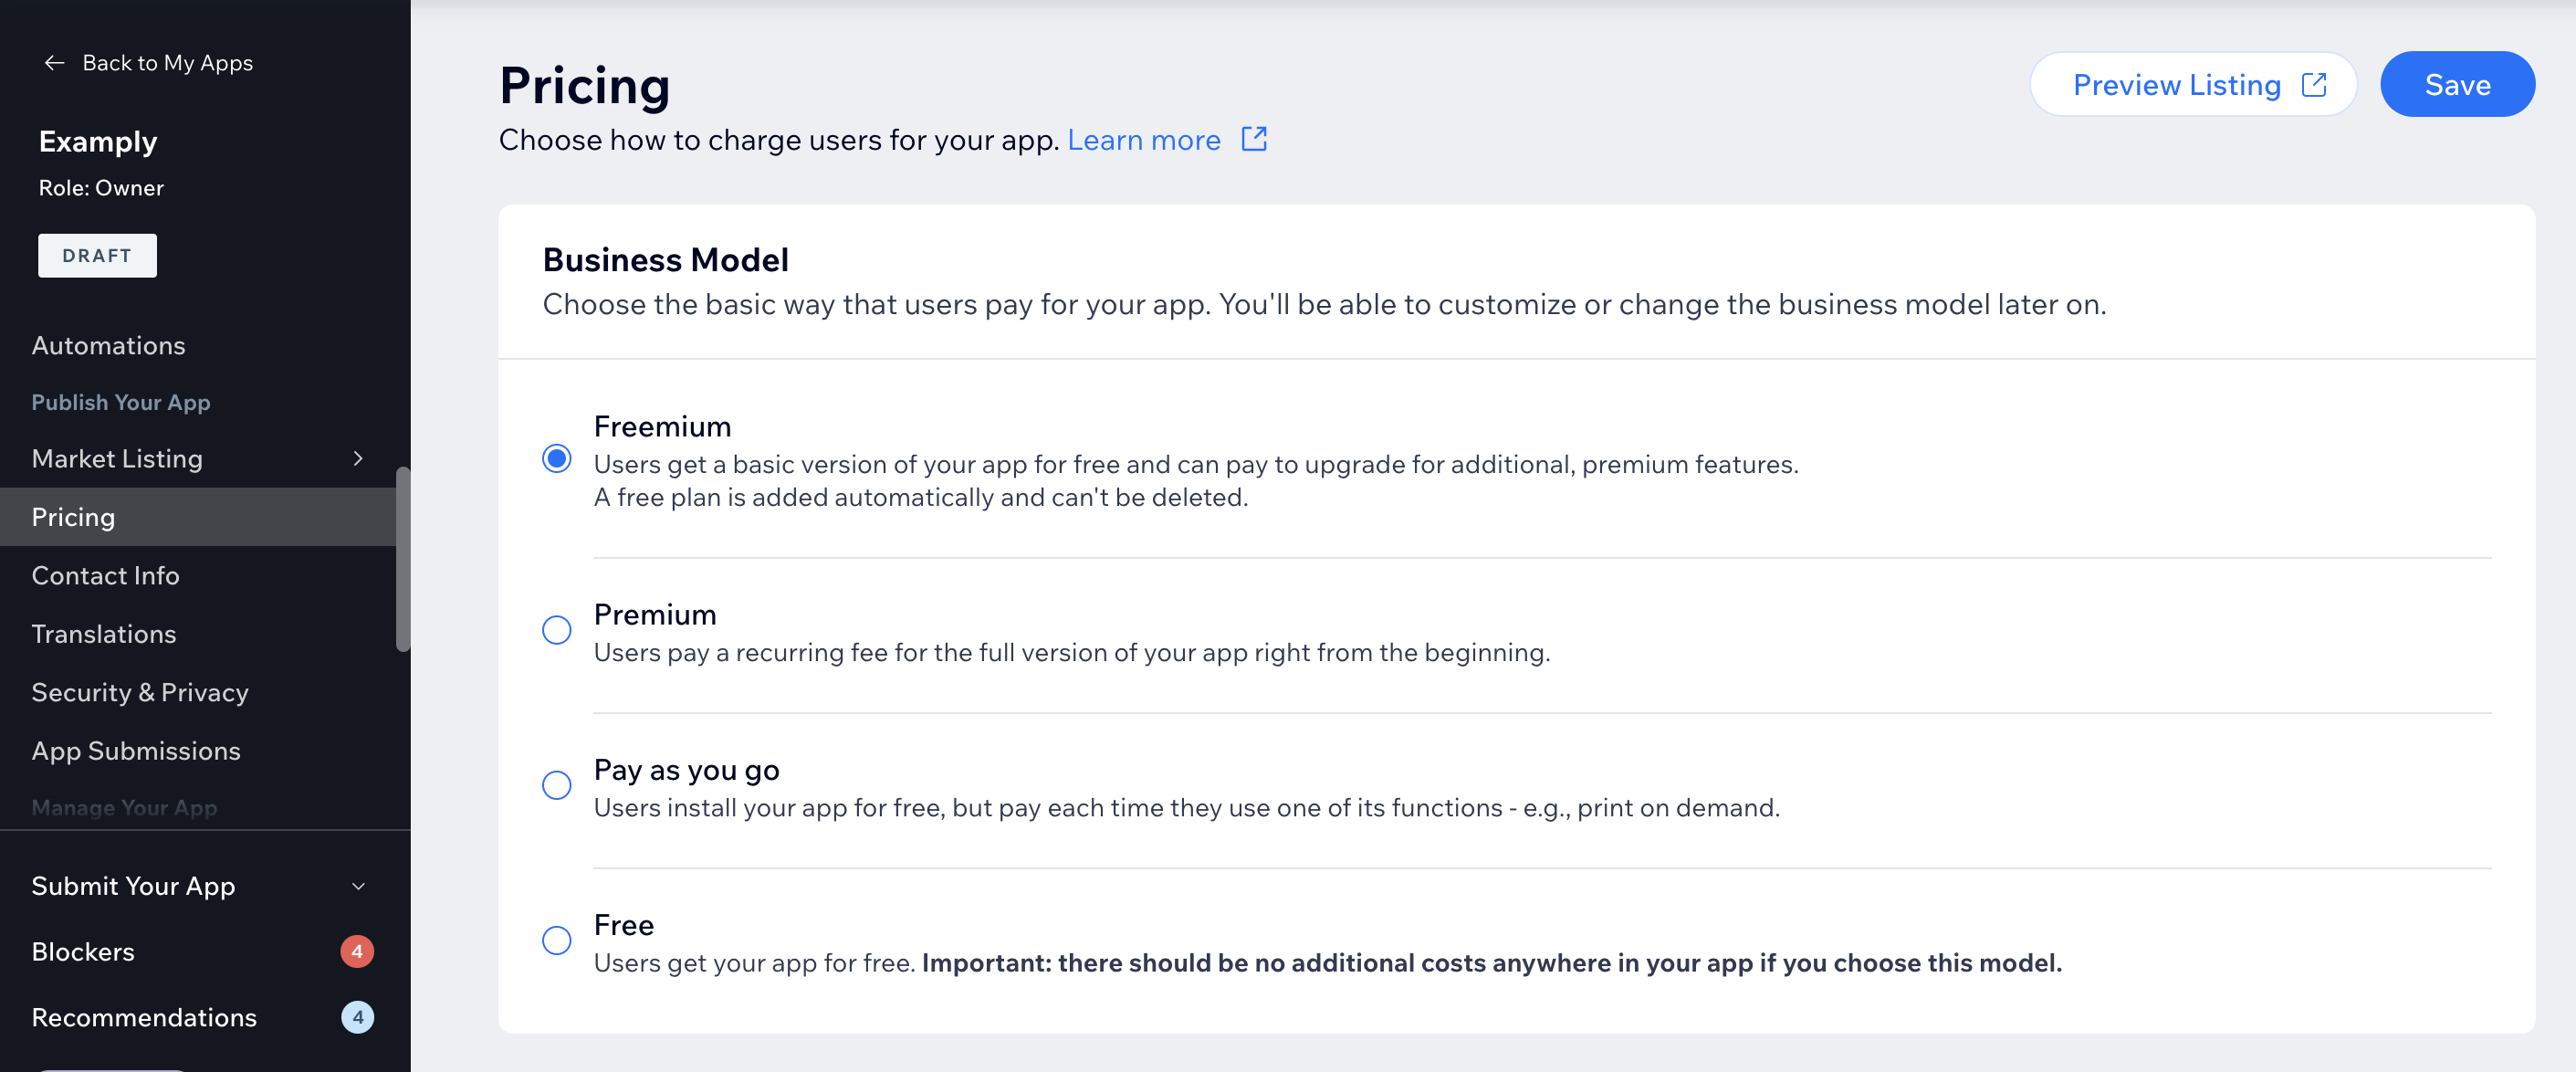
Business model options
Freemium (Recommended)
Premium
Pay as you go
Free
Multiple / mixed business models
In some cases, you might want to offer a mix of pricing plans – e.g., a combination of fixed tiers and a negotiable enterprise option. You'll need to follow the steps for Freemium or Premium above, then add an additional Dynamic Pricing plan.
2. Choose whether to offer a Free Trial
A free trial is a great way to show off your app's best features for a limited time, whether it's for a Freemium upgrade or Premium plan. After the trial, users can decide if they want to pay.
To do this toggle Free Trial on and input the amount of days you want to offer it for.

Managing your free trial
- Your app should work as if it's completely free during the trial: This means that the app instance query parameter won’t hold the Package ID, but the user’s site should display a premium app.
- Tell users how many days are left in the trial: You can do this by displaying a message in your App Settings panel or dashboard.
- If the user upgrades, unlock the paid features: When the user upgrades, the Package ID will appear in the app instance query parameter of your endpoint’s URL and App Instance API (important for dashboard apps), so you know that the user's upgraded.
- Notify the user and lock the app when the trial expires: It's your responsibility to track each user's trial period. When the trial ends you need to lock the app and send the user to the Wix pricing and checkout page to upgrade. Follow the guidelines in this PSD.
- In the Editor: Display a notification inside your website component to let the user know that the trial's expired.
- In the live site (and preview): Remove the app from the user’s live site or lock the app and display a notification for site visitors.
3. Add Pricing Plans
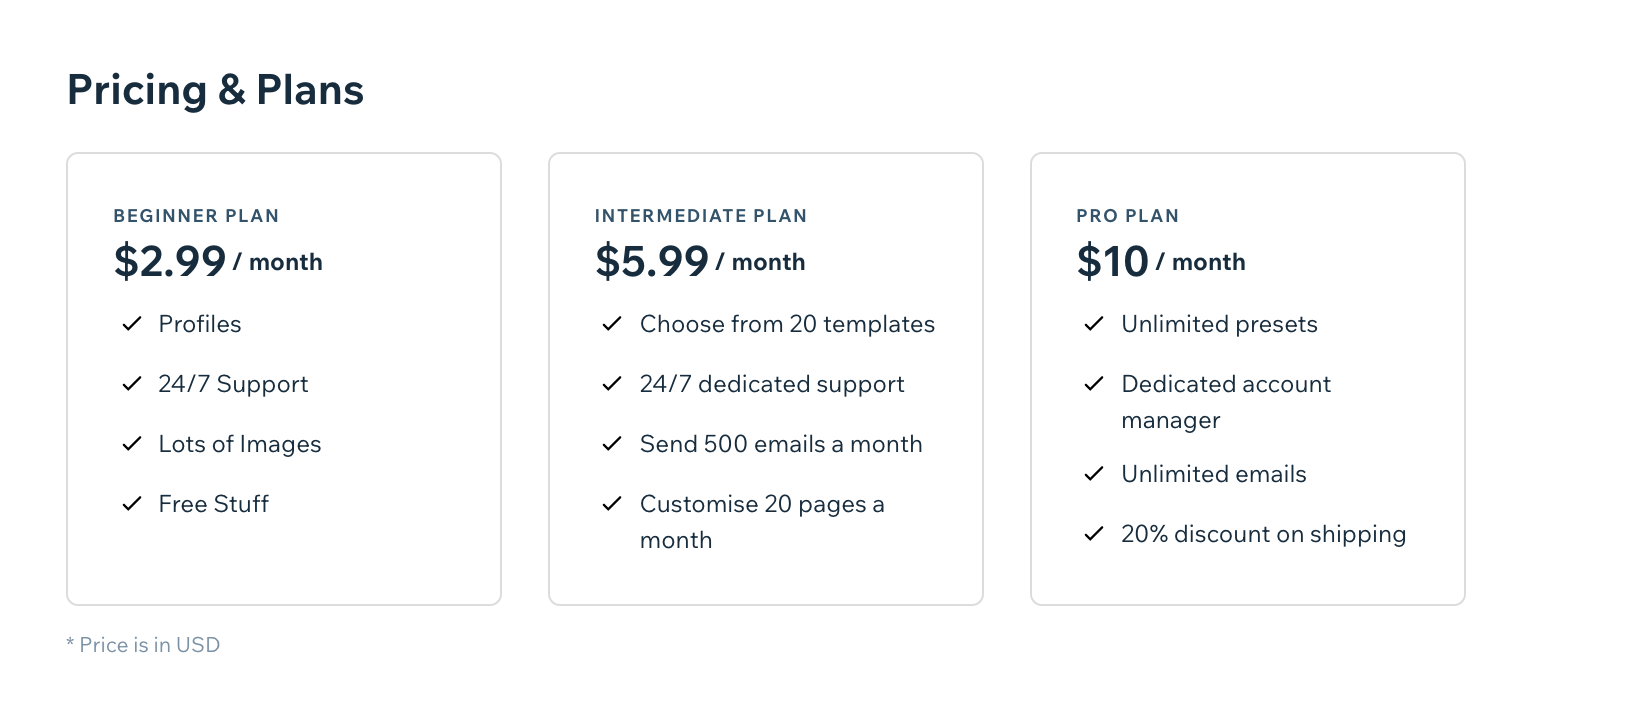
If you've chosen a Freemium or Premium business model you can add up to four plans each offering their own set of features and benefits.
These appear in your App Market listing under Pricing & Plans:
Add a new pricing plan
You need to add at least one paid plan for a Freemium and Premium business model.
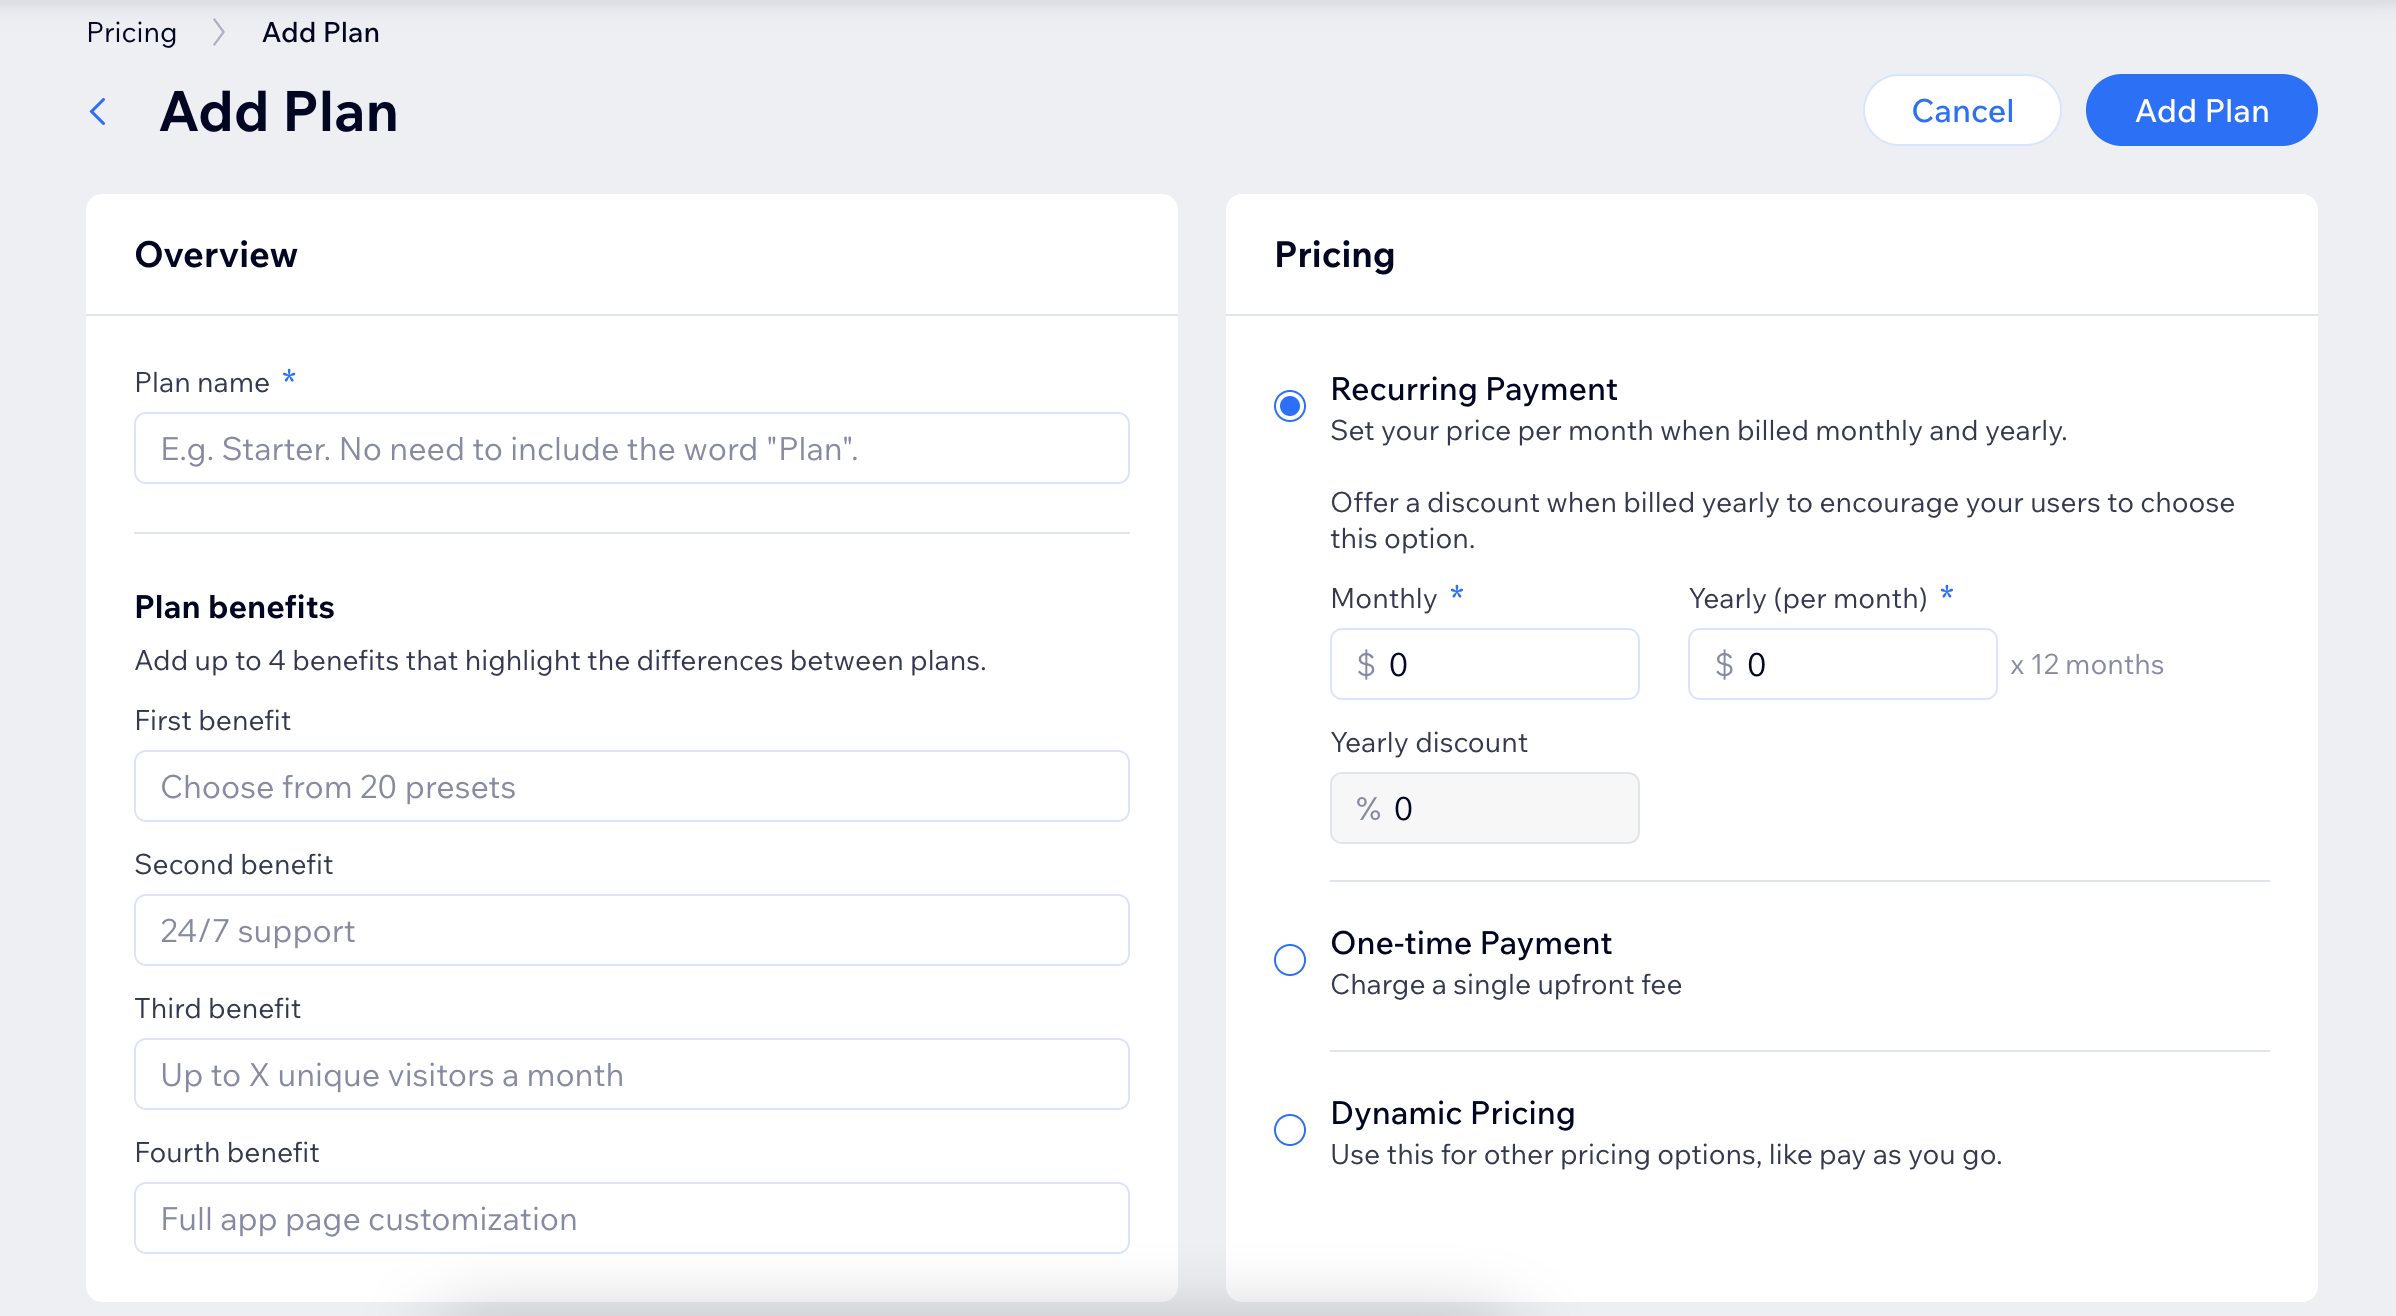
- Scroll down to Pricing Plans and click + Add Plan.
- Complete each of the following sections:
- Plan name: Add a name for each plan (max. 24 characters). Try to structure the names so they have some sort of progression – e.g. 'Beginner', 'Intermediate', and 'Pro'.
- Plan benefits: Add up to four benefits for each plan. These should show a clear distinction and progression for each plan, with stronger benefits reserved for plans with a higher price.
- Pricing: Add the price you want to charge for each of your app's plans:
Free plan in the Freemium model
The Freemium business model automatically sets up a free plan, and you won't be able to change the price. You can only update the name and features, or add additional paid plans.
Recurring Payment (Monthly or Yearly)
One-time Payment (In-app purchases)
Dynamic Pricing
5. Click Add Plan
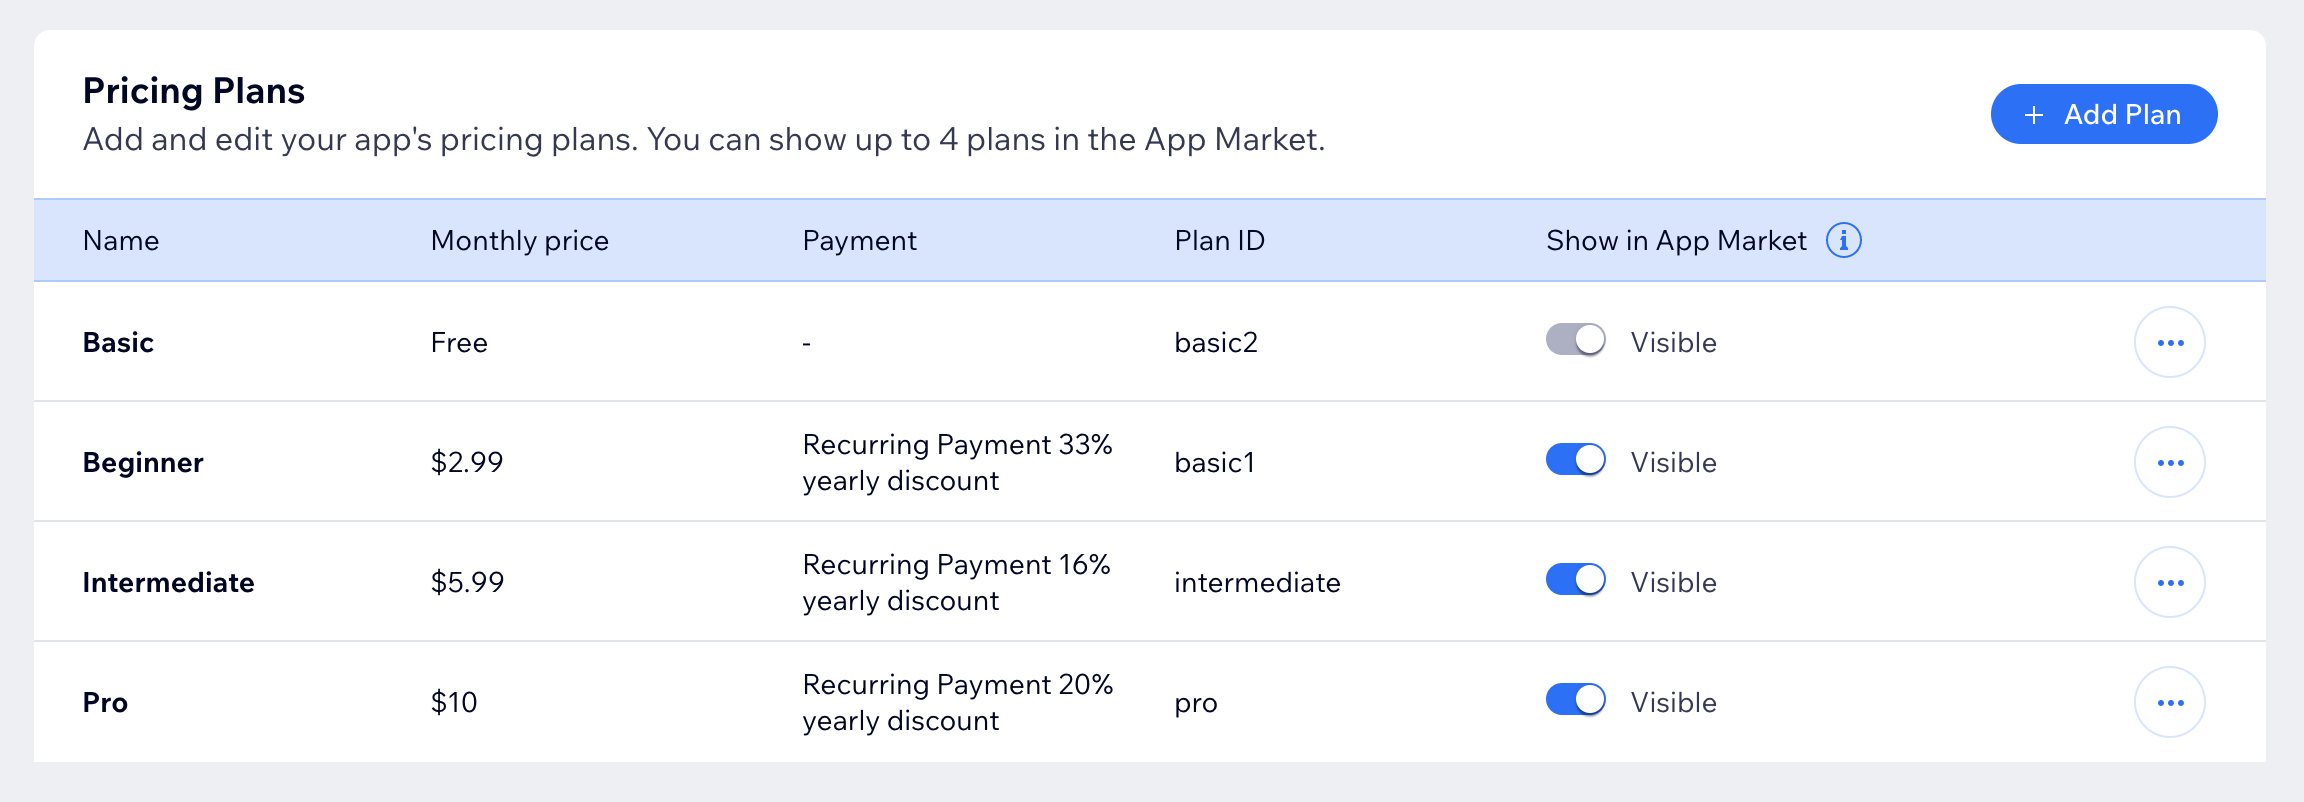
6. Hit the Visible toggle next to each plan to select whether it shows up in the App Market.
7. Click Save in the top right corner.
8. Use Preview Listing to see how it'll look on your live App Market listing.
You can see in this Freemium example we've added three plans on top of the default free plan:
Connect to the Wix payments system
Once you've set up your pricing and submitted your app for review our team will take care of connecting the plans to our billing system so that it's ready for when your app is published.
Pricing tips
Check out the competition: See how some of the other apps have set up their pricing
Consider: What your app does, and what value does it offer Wix users?
Charge a minimum of $1.99 a month: This covers processing fees and generates revenue. A lower price point doesn't necessarily offer an increase in conversion.
Offer incentives: You can set both Monthly and Yearly recurring plans. We recommend offering the Yearly plan at a lower price to incentivise users to pay for the year upfront. If you do this, we recommend offering at least a 20% discount to users that sign up for a year.
Currencies: If you have a global target audience, make sure to mention any special currency price exceptions you'd like to set up in the app review. Otherwise we'll convert the price automatically.
Change a pricing plan
You can adjust your Pricing Plans or add new ones for a number of reasons. E.g., changes to your product, to stay competitive, or just to increase prices.
When a user pays to upgrade your app, they'll keep paying this price even if you increase it later. If you decrease the price, the lower price is applied to all users – even those that upgraded before the change.
Learn more about changing your pricing plans.
Important: 30 days' notice
As per section 9.1 of the Partner Agreement, you need to give us a minimum of 30 days' notice if you're making any changes to your Pricing Plans.
Detect paying users
If you're charging for your app you need to identify paying users. We've got a dedicated guide for for that.
Offer in-app purchases (One-time Payment)
You can offer packages that users pay for as standalone, one-time purchases.
E.g., if your app sells custom images to users, you can sell each image as a one-time purchase, offer a package of 10 images, and more.
Important:
You can't mark your app as 'Free' and then offer in-app purchases / one-time payments, as this would mislead users.
Here’s what you need to do:
- Design your own pricing page: Display this page in your settings panel/dashboard component to show users the different packages.
- Direct users to our billing page: The Get URL API returns a URL so that you can open the Wix billing page for users to complete the payment. Open the billing page as a new tab.
- Keep track of the user’s balance: Use our Get Purchase History API to get information about the user’s purchase, and then track the user’s balance on your server.
Once a user makes a purchase in your app, you need to keep track of the user’s balance:
- Listen for the billing webhooks: We send an HTTP post request to your server URL whenever a user makes a purchase. Check the cycle property in these webhooks:
- Use the Get Purchase History API to retrieve the user’s purchase history: This is important as you shouldn’t rely only on webhooks to know when a user makes a purchase.
- Update and track the user’s balance on your server: You should keep track of and display the user’s remaining balance – even if the user deletes your app and then adds it again. It also helps you to know when a user runs out of credit.
4. Set up a Wix pricing page and checkout
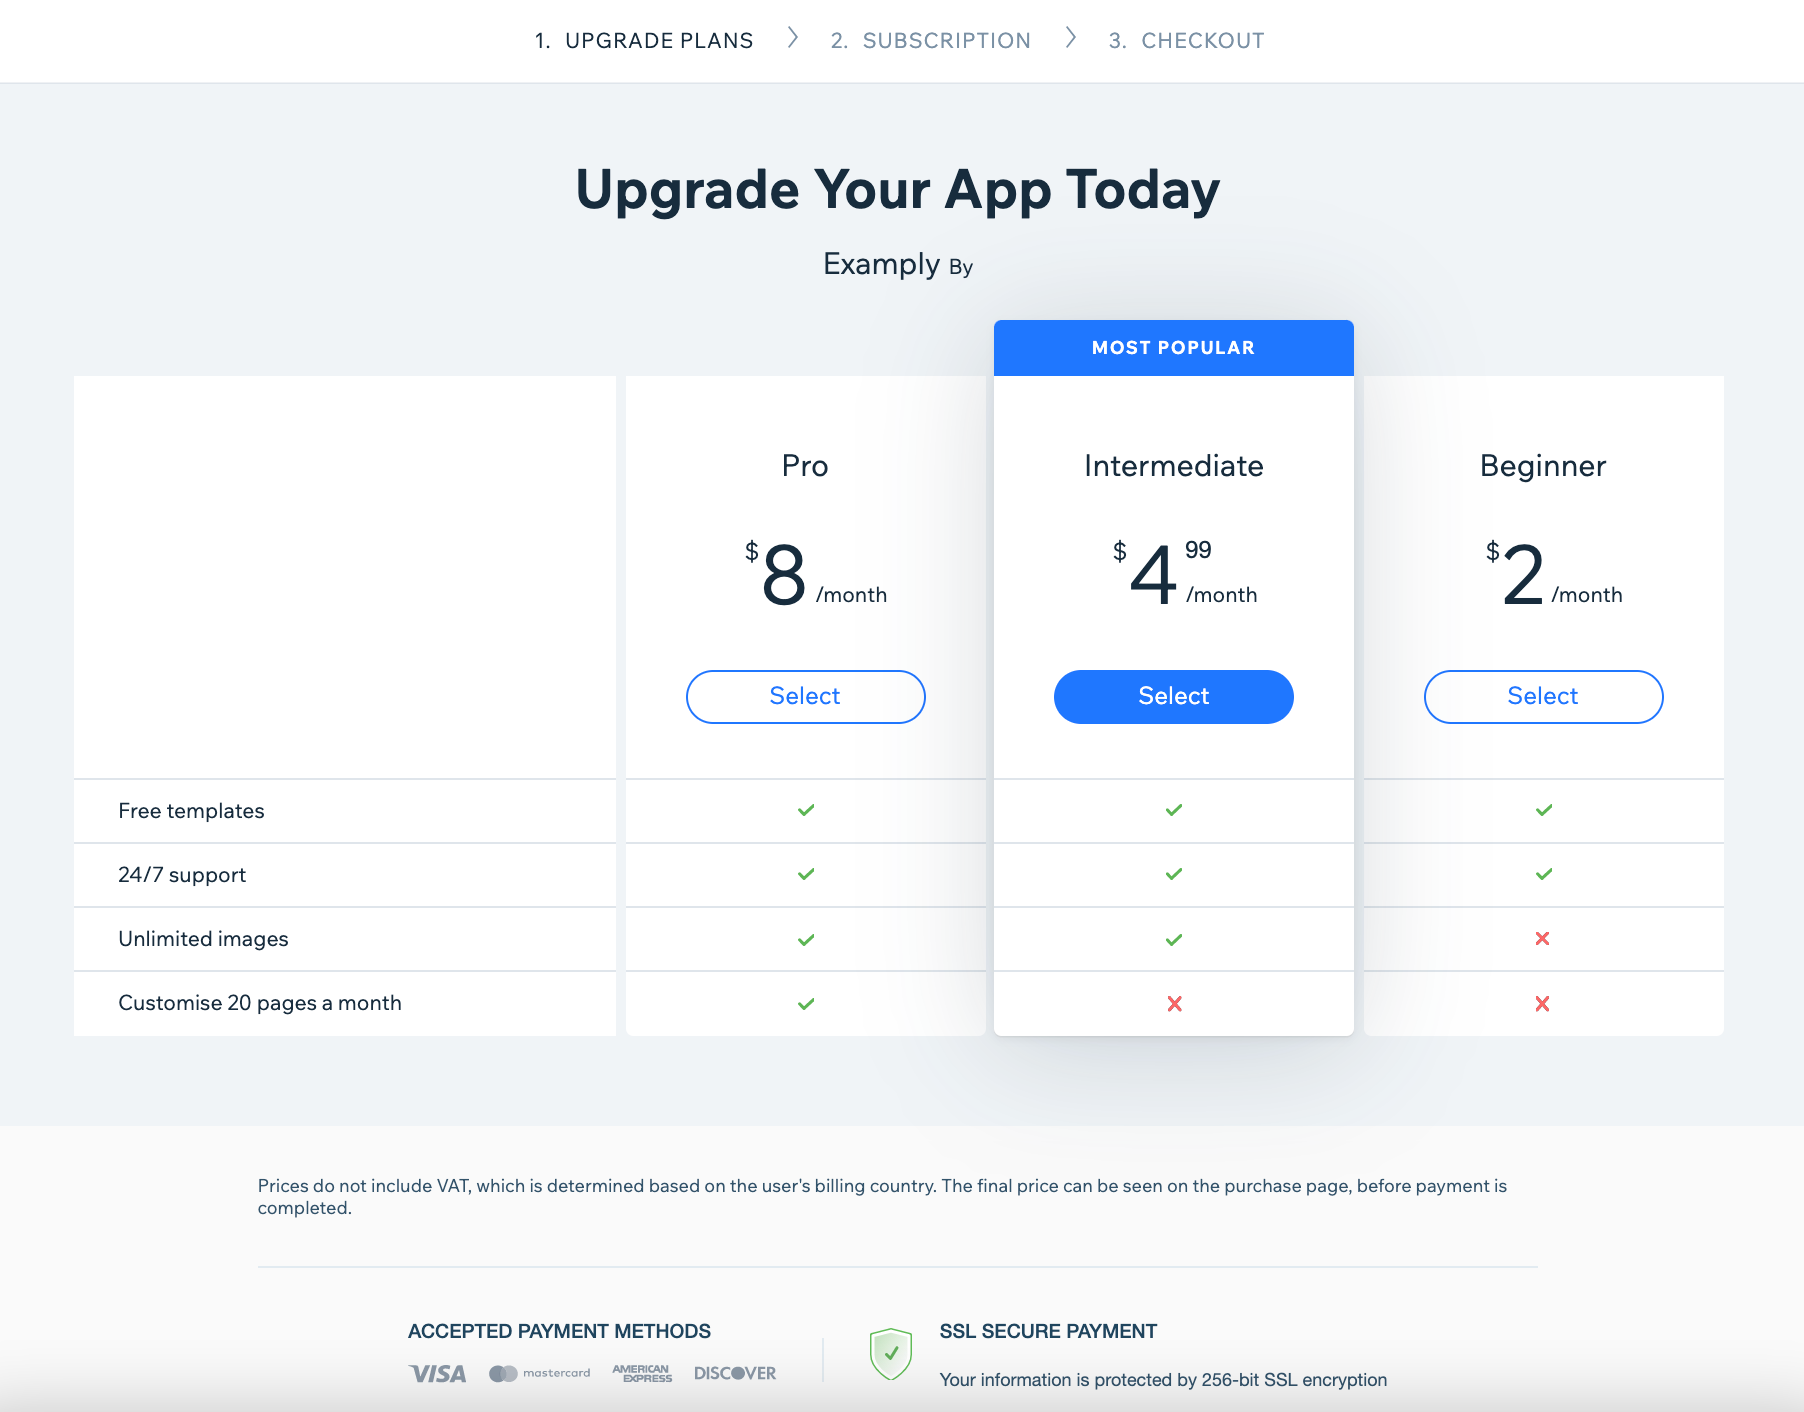
This is how a user chooses and pays for an upgrade after they've installed an app. It shows all the key features of each paid plan.
This section shows how to manage pricing and payments using Wix pricing and checkout. If you want to host it yourself then skip to the external pricing page and checkout guide.
- Scroll down to Pricing Page and Checkout
- Select Wix pricing and checkout, then click Customize Pricing Page. You won't be able to select this option if you don't have any paid plans.

- Click Add Plan Feature.
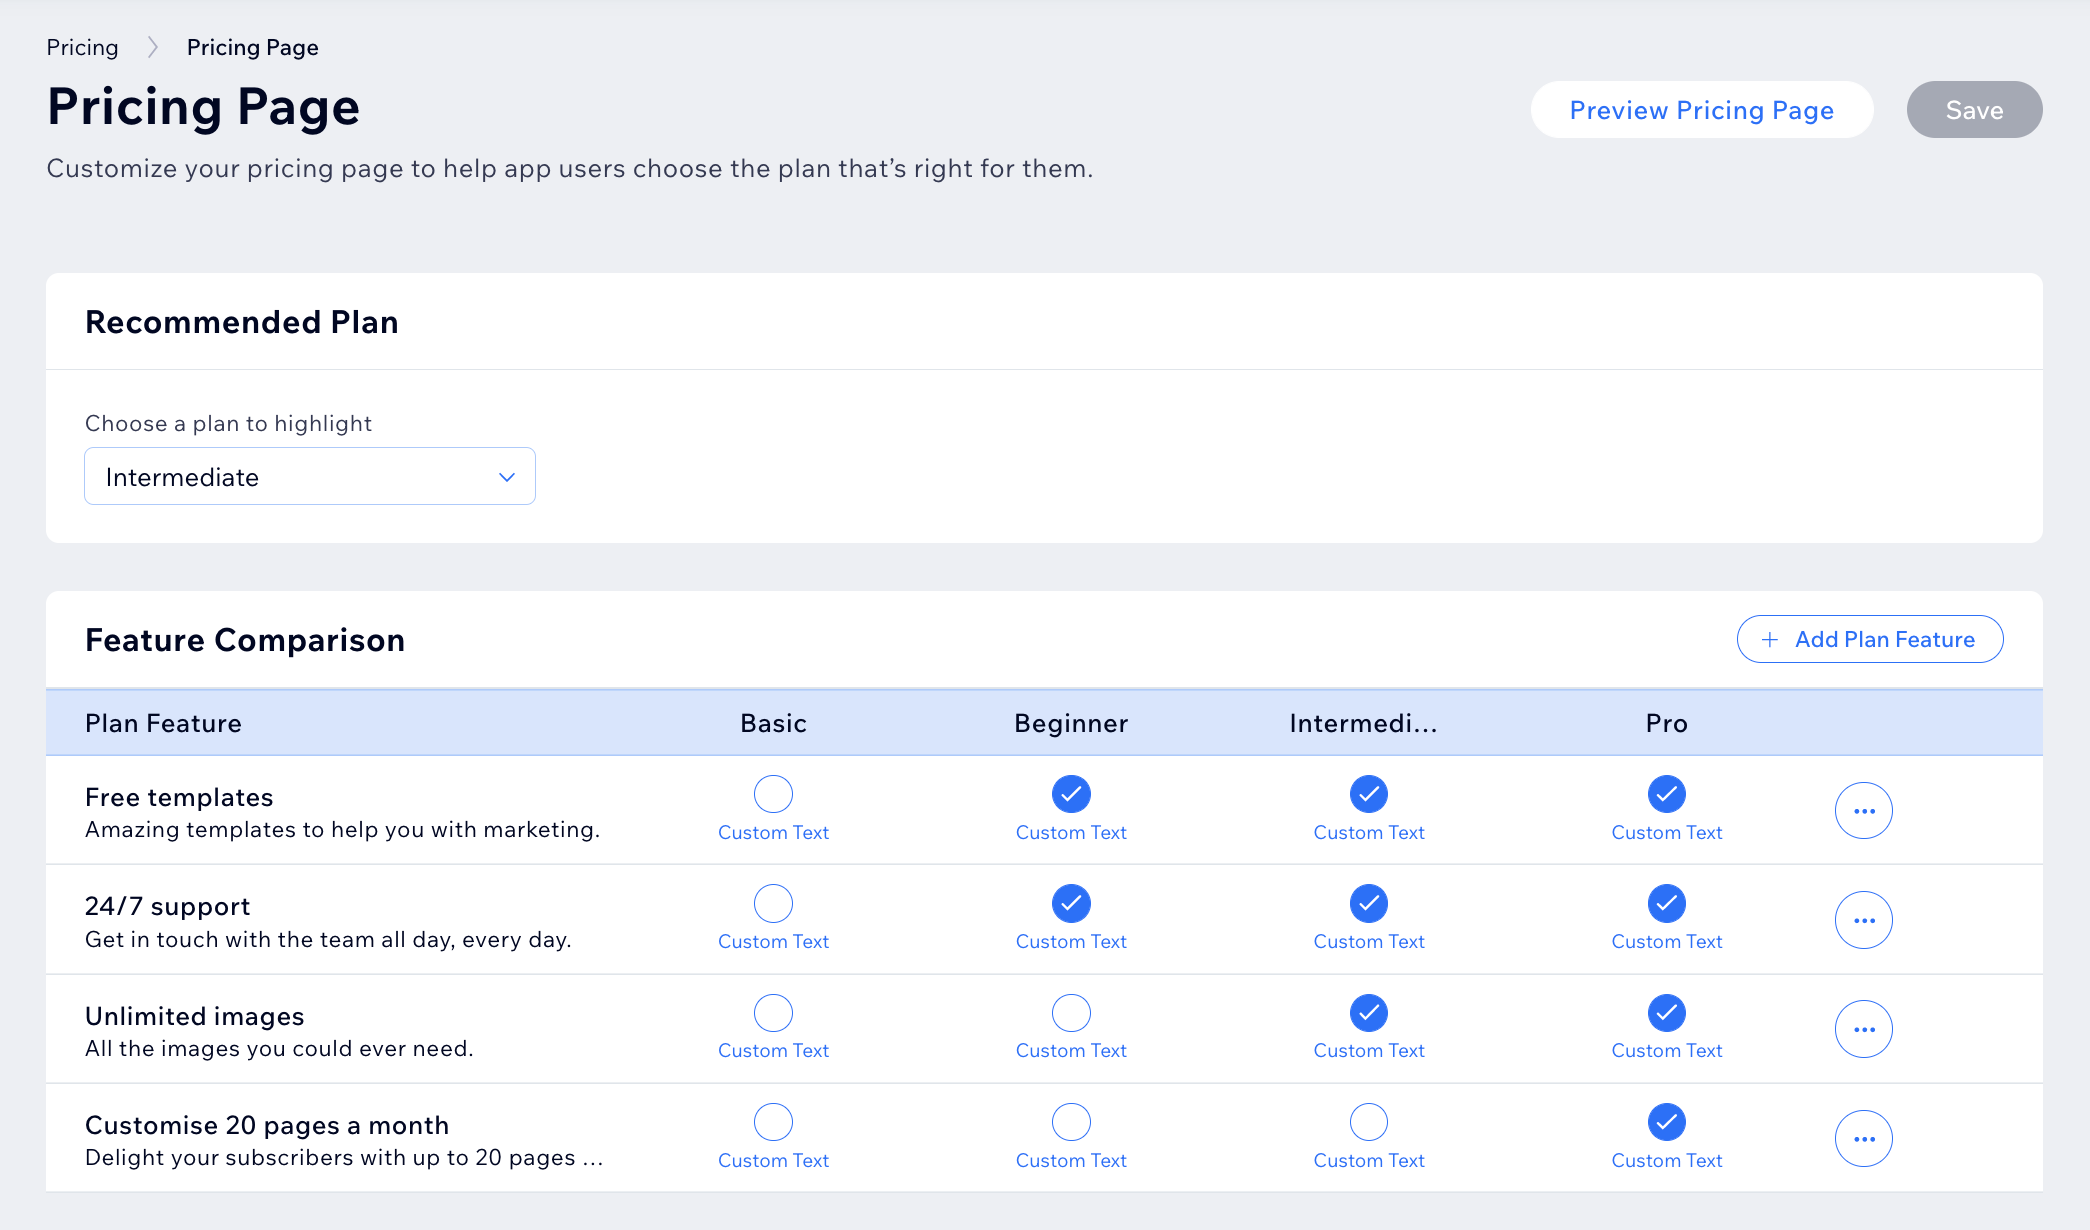
- Add a Feature Name and Feature Description (up to 200 characters). The description should say what it includes and why it's useful.
- Click Save.
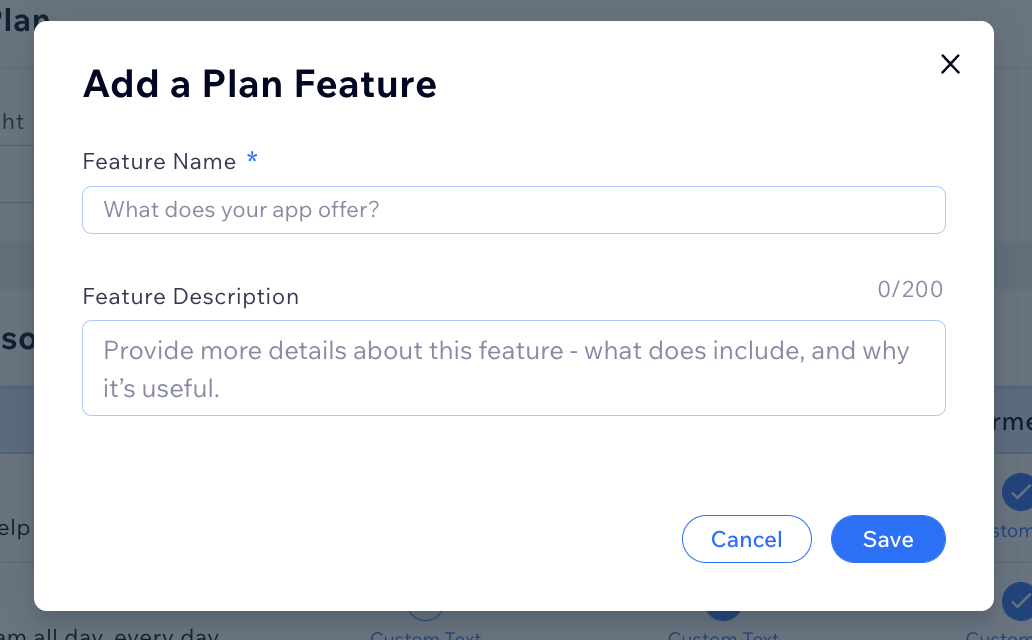
- Select the features you want to be available under each plan in the Feature Comparison grid – make sure you distribute these features progressively, with better features reserved for more expensive plans.
- Recommended Plan – this is shown as 'Most Popular' on your Pricing Page.
- Click Preview Pricing Page at the top of the page to see how it'll look live on site.
Note:
A maximum of four plans can be shown on the Pricing Page. If you have more than four plans you need to use your own External Pricing Page.
Important:
To make sure your upgrade CTAs lead to our Pricing Page you'll need use this URL with the APP ID and INSTANCE ID in the correct place:
https://www.wix.com/apps/upgrade/APPIDHERE?appInstanceId=INSTANCEIDHERE
5. (Optional) Set up an external pricing page and checkout
You may prefer to host your app's pricing page on your own platform. You need to do this if you have more than four pricing plans as the Market Listing only displays a maximum of four. To do this select Link to External Pricing Page and insert your page's URL.
1. Set up OAuth and webhooks
First, make sure you've set up OAuth and subscribed to the following webhooks:
2. Choose external pricing
- Scroll down to Pricing Page and Checkout
- Select External pricing page
- Add the URL for the page you want to use.
- Click Save.

3. Lead users to your pricing page
Your pricing page can be reached in two ways:
- Your App Market listing: Users who click this link usually want to see your pricing, but probably haven't installed the app yet. Make sure these users can see the pricing without needing to sign up.
- The Upgrade App button in Manage Apps: We attach a query parameter to your pricing page with the user's App Instance when they click this link. This lets you automatically identify users, log them in, and show them relevant pricing info.
Identifying Wix users
Use each user's unique App Instance ID to recognize them as a Wix user and display the right settings.
4. Connect your CTAs to the Wix API
Connect each of your plans' CTA buttons on your pricing page to the checkout link you receive from Wix's Billing API – the link's valid for 48 hours, so you need to refresh this regularly.
5. Redirect users to the checkout link
When a user clicks a plan's CTA, you need to direct them to the checkout link you received in the API response. This means users continue the checkout process within Wix.
- Once the user completes their purchase, Wix redirects them to the Success URL you submitted in the API call (if the purchase was successful). If you haven't included a Success URL, we use our own default success page.
Success URL for Internal Dashboards
If your app uses an Internal Dashboard, set your Success URL so that it leads back to the Dashboard by using http://www.wix.com/my-account/app/<appID>/<AppInstanceID>
- If you've registered to the Paid Plan Purchased webhook, you should receive it at this point. The webhook payload includes the Plan ID.
To validate that the user has signed up to a premium plan, call the App Instance endpoint to return the user's plan.
Testing your plans
- Pricing is set to 0.00 during development: All plans are automatically set to a price of 0.00, so you can test the flow. Once your app's approved, your plans' real prices will be activated.
- Block user downgrades or repurchases: Make sure that users can't downgrade or repurchase using your External Pricing Page – this includes switching from yearly to monthly pricing. To downgrade, repurchase, or switch to monthly pricing, users need to cancel their subscription and purchase the cheaper plan
Was this article helpful?
