Developer Support
How to Set Up OAuth
6 min read
·
Last updated on Apr 27, 2023
If your app requires access to a site's private data (e.g., contacts, orders, etc.), site owners must give you permission to collect this data when they first install your app to their site. We use OAuth 2.0 to authorize your app to access our APIs and site data.
The OAuth flow
Before you start, it's important to understand how the OAuth flow works. The diagram below shows the OAuth flow based on the actions of the user, your app, and Wix:
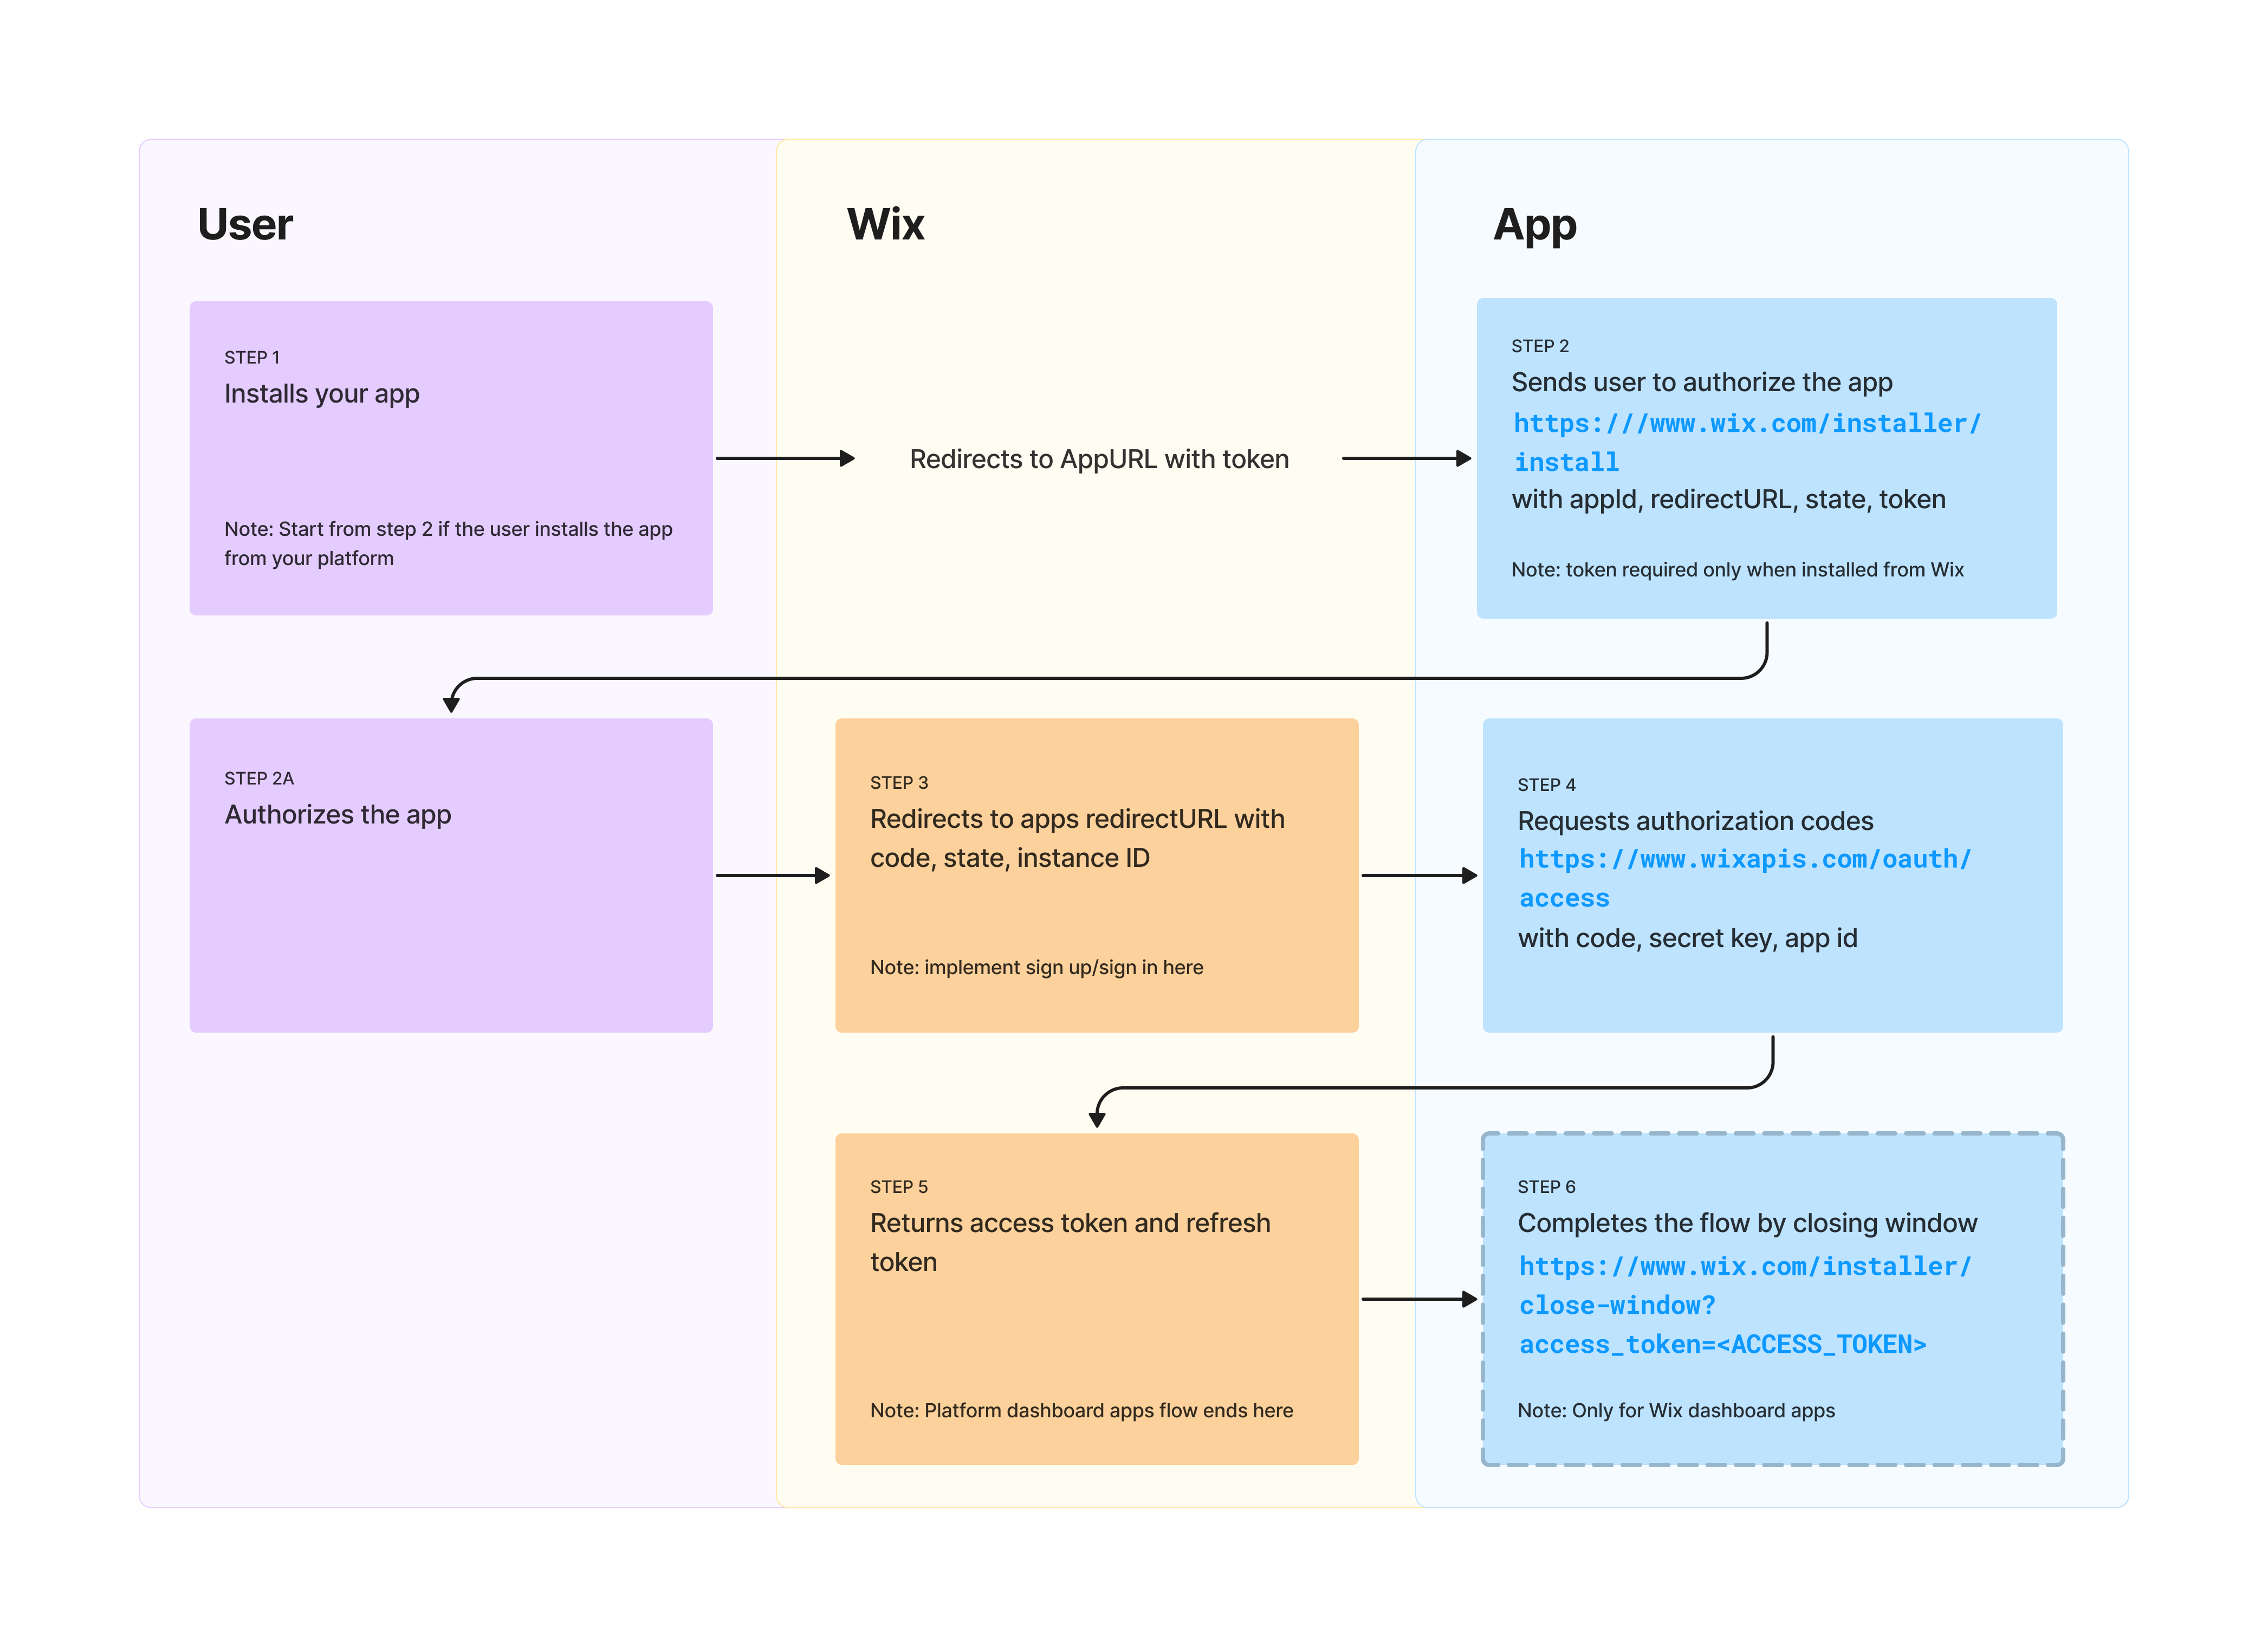
Step 1: User installs your app
If the user installs your app from within the Wix App Market, we redirect users to the App URL you defined in the Wix Developers Center. We include a token query parameter when we direct users to your App URL (it's used to keep track of the user as they go through the OAuth flow).
Note:
This redirect to the App URL is a back-end process only. The user shouldn't have to log in or sign up here – send them straight to the authorization request step described next.
Important:
When the user installs your app from your own platform, skip this step and go straight to step 2.
Step 2: App redirects the request to Wix
Your app should redirect users to https://www.wix.com/installer/install so that we can ask them to approve a list of permissions your app is requesting.
Send the following query parameters with the URL above:
- token (required during installation from Wix only): The token you received as a query parameter to the App URL. We use it to keep track of users as they go through the OAuth flow.
- appId: Your App ID, as defined in the Wix Developers Center.
- redirectUrl: One of the redirect URLs you defined in the Wix Developers Center. You may define a separate redirect URL for each workflow (e.g., from the App Market and from your platform).
- state (optional): You can add a unique string to identify users that were authenticated in the previous step. This is how you'll identify the user when we send them to your redirect URL.
Important:
Every redirect URL your app might use must be defined in the Wix Developers Center in advance.
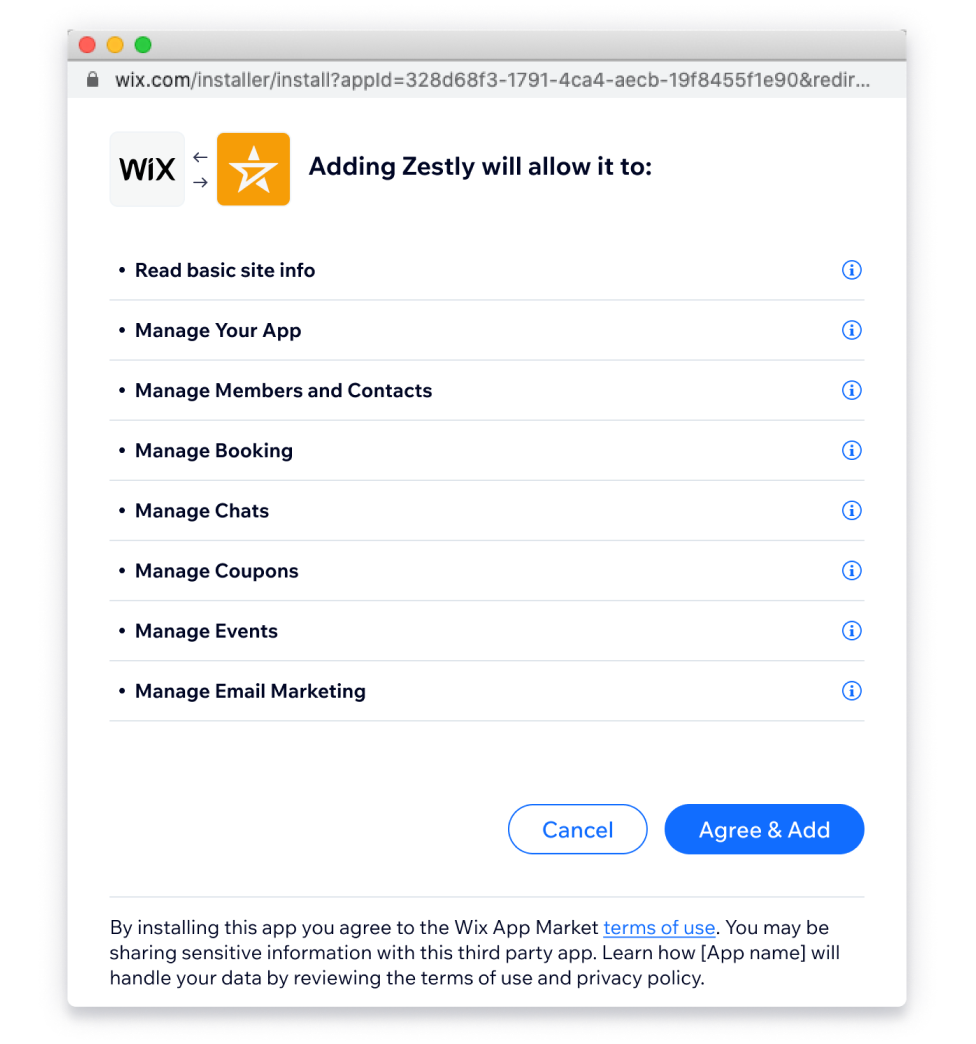
Step 2a: User authorizes the app
When the user approves the permissions your app has requested, Wix will continue to the next step.
Step 3: Wix redirects user to app's redirectURL
Wix will redirect the user back to your specified redirectURL along the following query parameters:
- code: A temporary authorization code, valid for up to 10 minutes. You need this to request an access token to use our API.
- state: The same value in case you provided one in the previous step. If the states don't match, the request may have been created by a third party and you should abort the process.
- instanceId: The unique ID created for your app installation in the user specific site. All of your app’s components in the site share the same instance ID. Your app should always identify users using the instance ID.
After this step, the user is finished. However, your app still has some work to do.
Important:
If your app requires user login or signup – do so here, or later on. It can't be done prior to this.
Step 4: App requests the authorization code
Once the user completes the installation process and gives your app permission to access their data, use the temporary authorization code we sent, together with your Secret Key, to request an access token and a refresh token (the access token is only valid for 5 minutes).
You can find your Secret Key in the Wix Developers Center. This request must be a secure, server-to-server request.
Exchange the temporary authorization code for an access token using the Request an Access Token API method:
1 2 3 4 5 6 7 8 9curl -X POST \ https://www.wixapis.com/oauth/access \ -H 'Content-Type: application/json' \ -d '{ "grant_type": "authorization_code", "client_id": <APP_ID>, "client_secret": <APP_SECRET>, "code": <AUTH_CODE> }
Step 5: Wix returns access token and refresh token
Wix will respond to your request with a JSON response containing an access token and a refresh token (these tokens are not relevant for webhooks):
1 2 3 4{ "refresh_token": <REFRESH_TOKEN>, "access_token": <FRESH_ACCESS_TOKEN> }
Requesting new access tokens
Request a new access token every time you call an API. Access tokens expire after 5 minutes. Use your refresh token to request a new access token.
Step 6 (for Wix dashboard users only): App completes the OAuth flow by closing window
This step is only required for apps with a dashboard component that opens inside of Wix as an iframe, or another internal component.
Once an app is published you need to actively close the consent window by redirecting the user to the following URL with the user's access token after the equals sign (=):
1https://www.wix.com/installer/close-window?access_token=<ACCESS_TOKEN>
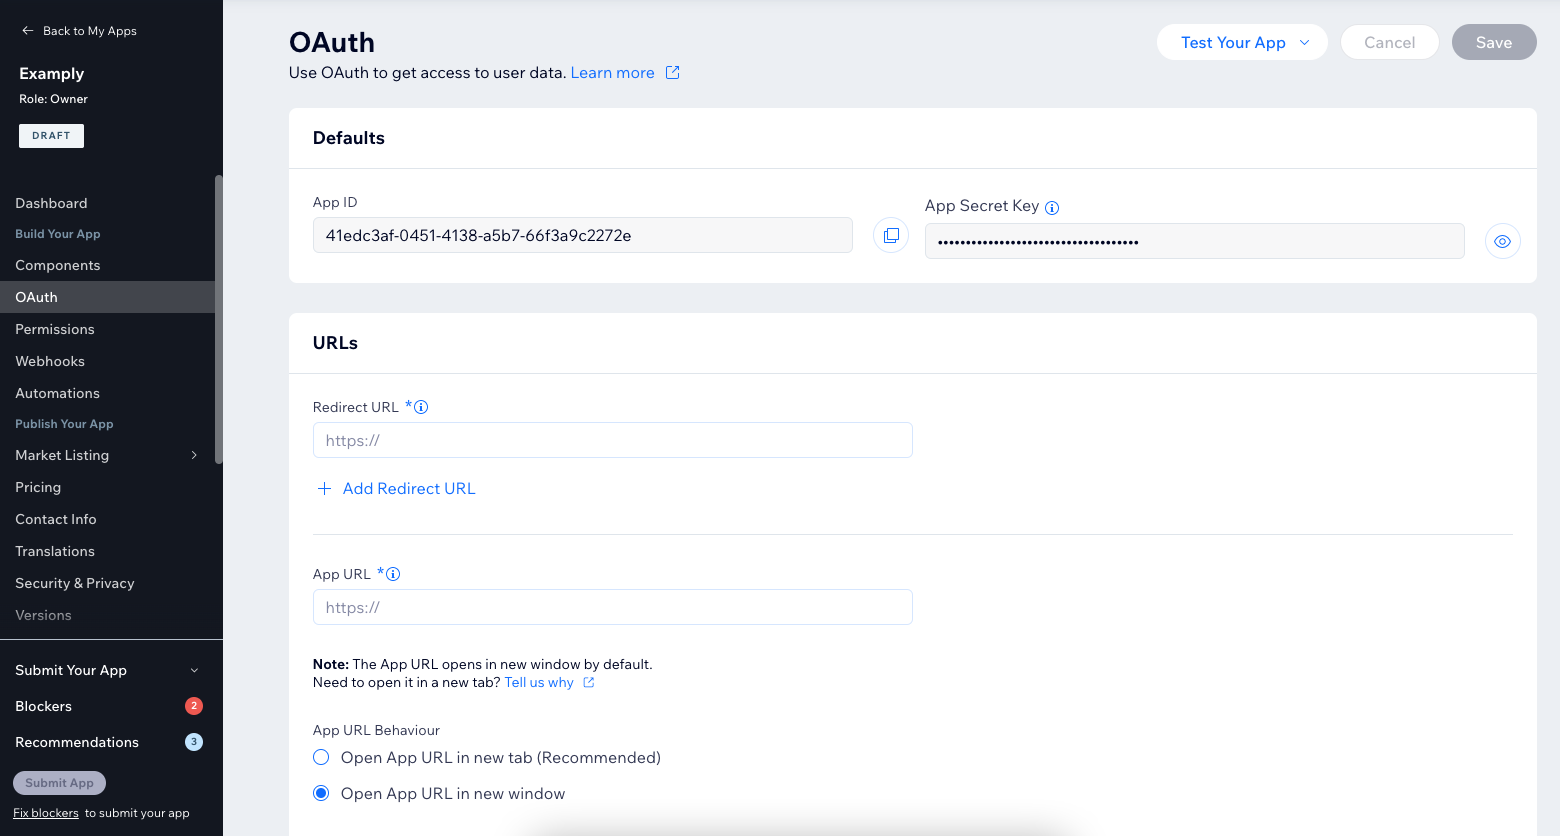
Set up OAuth in the Wix Developers Center
- Go to OAuth in the side menu (under Build Your App).
- In the Redirect URL field, enter the URL we should redirect to once users authorize your app. This is where you collect the user's token query parameter during the OAuth flow.
- In the App URL field, enter a URL we should direct users to when they first get to your app.
URL Requirements
- HTTPS: Wix uses HTTPS to maintain high security standards. All URLs, whether they are OAuth or iframe need to use HTTPS throughout the development process, otherwise they won't load on the Wix system.
- Localhost or ngrok: You can use both of these during development, but you need to change the URL before you submit your app for review. As localhost and ngrok run on your local machine, our team won't be able to check them when reviewing your app.
4. Click Save.
Make a note of the App Secret key
You need it to get the access token later on. Keep your secret key safe and secure – don’t share it with anyone or make it public in any way.
Next steps
App requests protected data
Use our API Reference to request the user's protected data, with a fresh access token as the authorization header. For all future API calls, you will need to request a new access token, using the refresh token you received in step 5.
App finishes installation
At this point your app is designated “Setup Incomplete”. This state is useful if your app requires users to create an account or set other configuration parameters in order for the app to become active.
Once your app requires no further setup steps, create the following request to mark the installation as finished:
1 2 3 4 5 6 7curl -X POST \ https://www.wixapis.com/apps/v1/bi-event \ -H 'Authorization: <AUTH>' \ -d '{ "eventName": "APP_FINISHED_CONFIGURATION" }’ \
Note:
Until the endpoint is called, the app is marked as "Setup Incomplete" in the Wix database.

Was this article helpful?
