Developer Support
Guided Tutorial: Build an App
11 min read
·
Last updated on Mar 16, 2023
Thinking about building an app for the Wix App Market, but not sure where to start or what's possible?
At Wix DevCon 2022 we hosted an end-to-end guided tutorial on how to build an app in under an hour. The aim is to show how simple it can be to create and sell apps on the Wix App Market, along with a tour of the Wix app developer platform.
At Wix DevCon 2022 we hosted an end-to-end guided tutorial on how to build an app in under an hour. The aim is to show how simple it can be to create and sell apps on the Wix App Market, along with a tour of the Wix app developer platform.
What you'll build in this tutorial
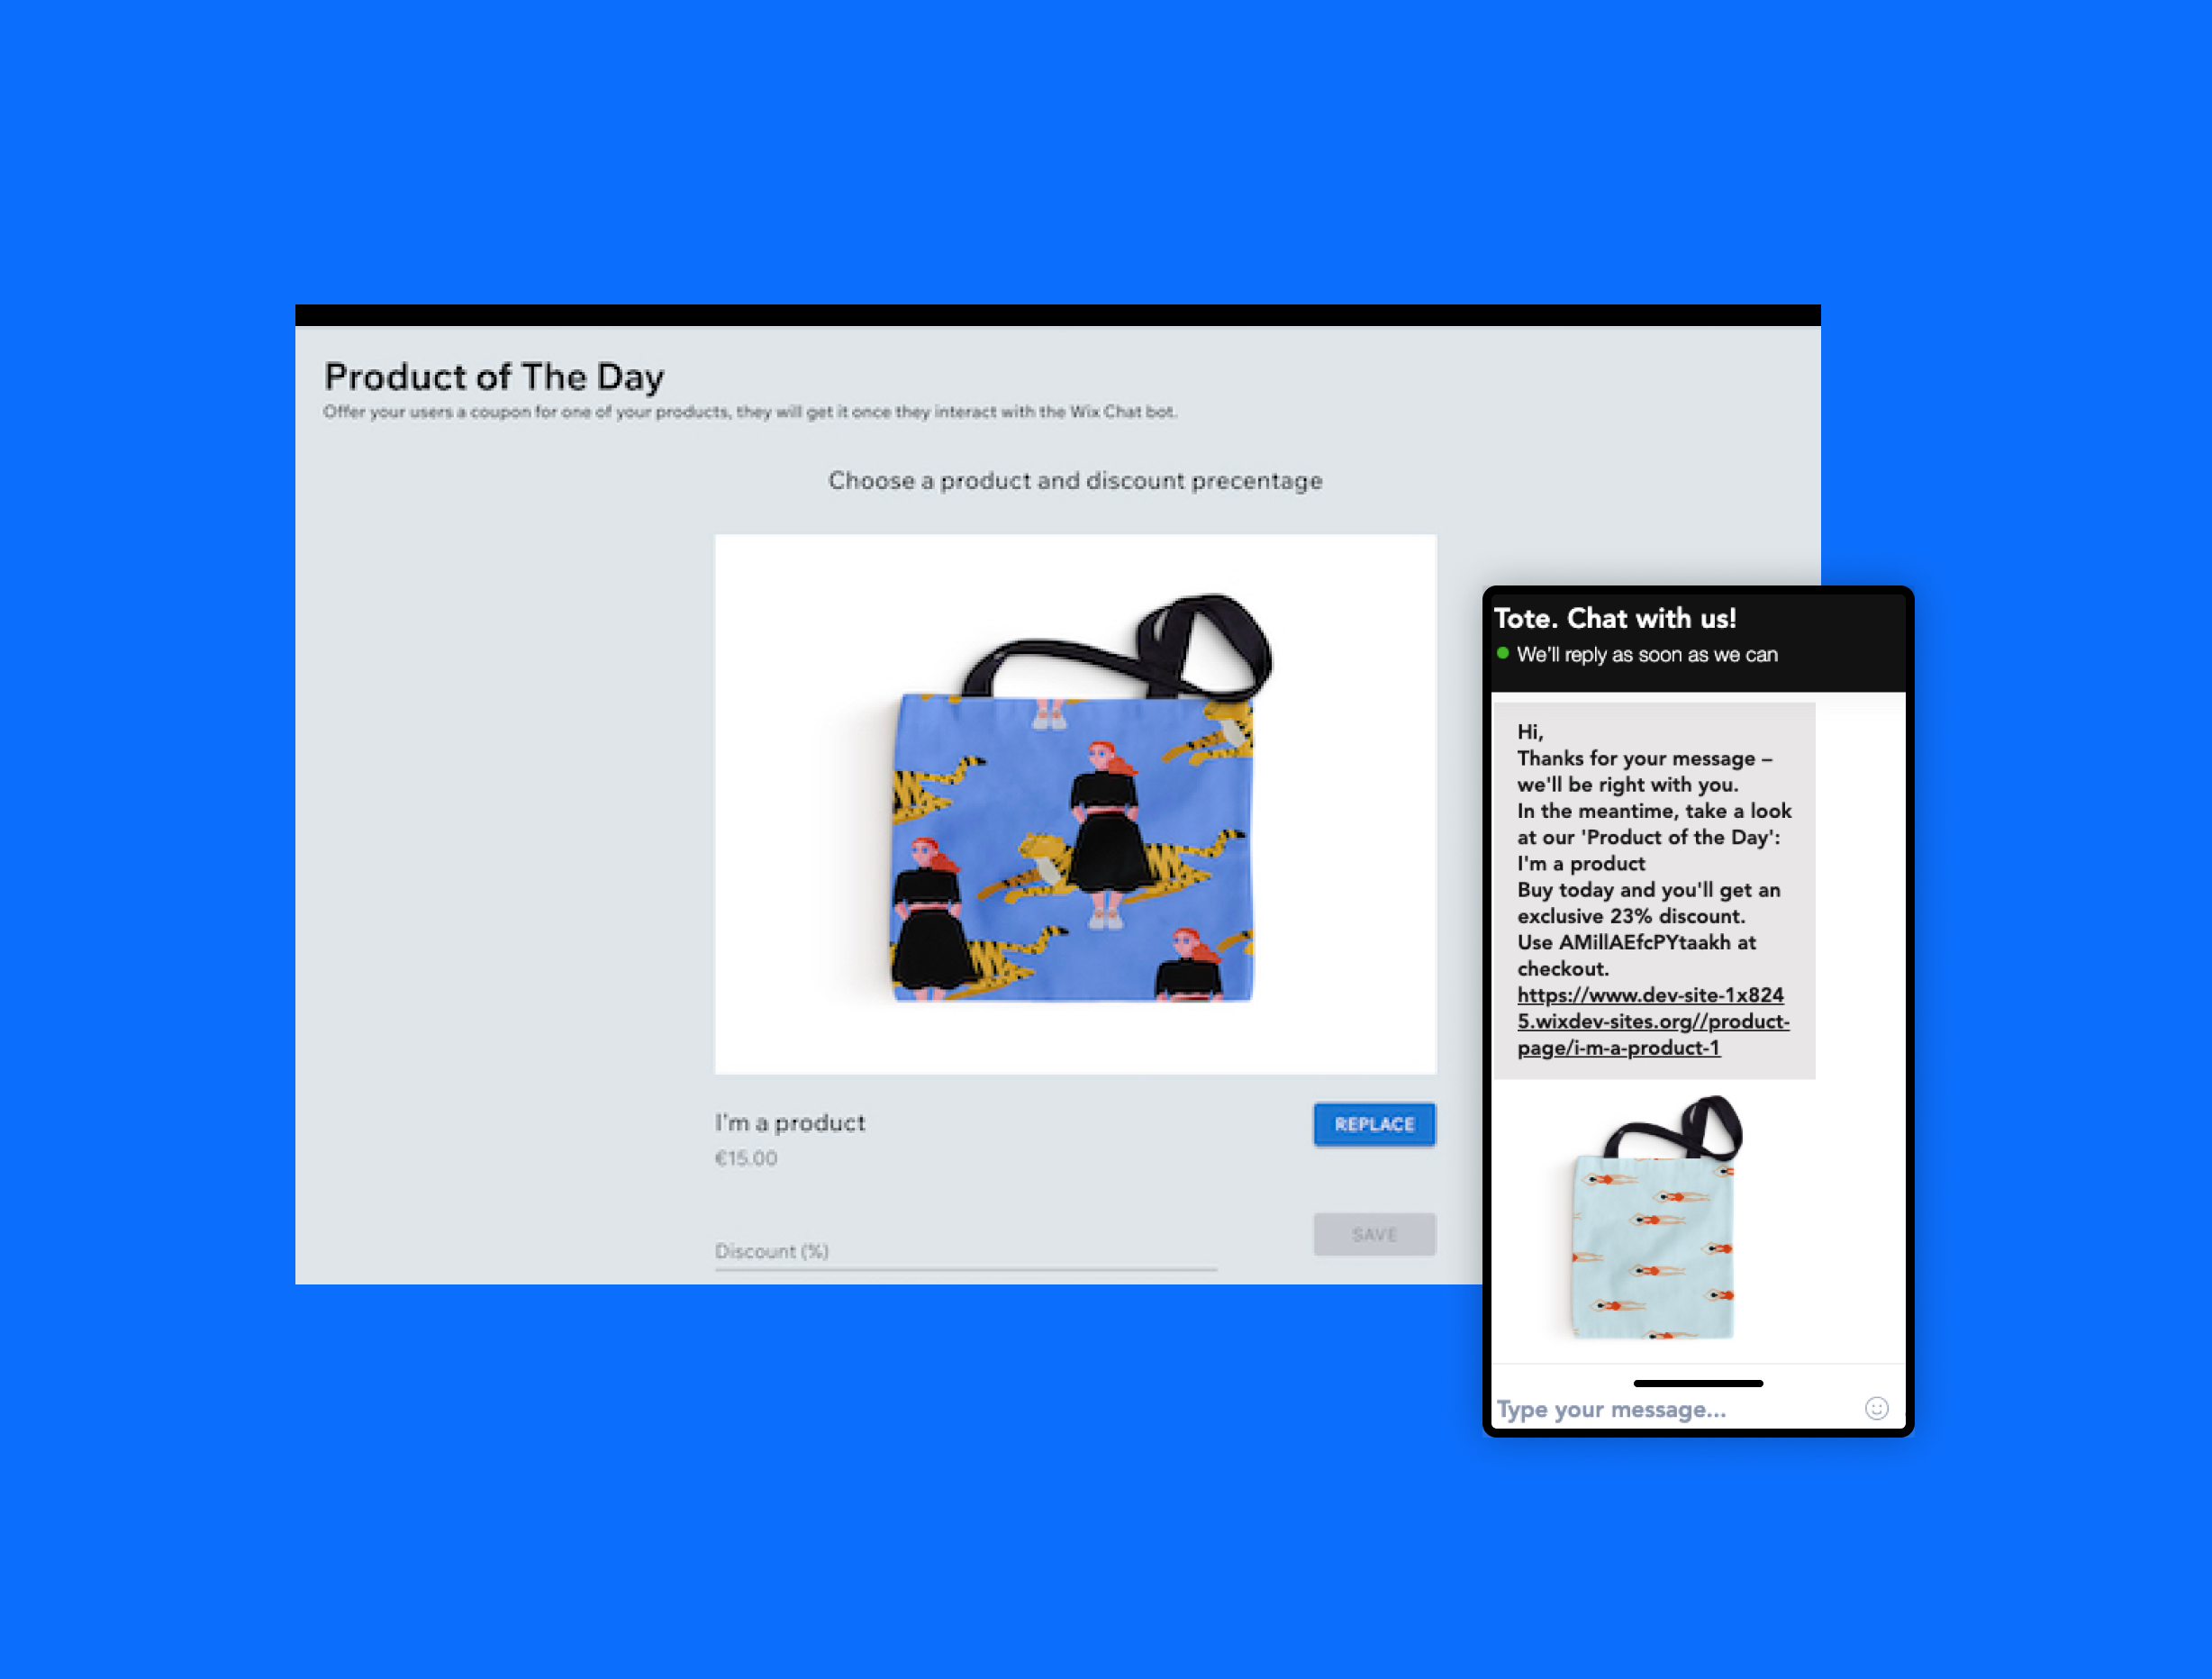
The app you'll create in this demo lets Wix site owners offer a discount on one of their products through the Wix Chat widget.
Before you get started
There's a couple of things you need to do before you start:
- Sign up to Wix (or log in if you've already got an account).
- We need to install an NPM (Node Package Manager) on your computer – we recommend Node.js version 16.4 as this is what we used for the demo.
- Install an IDE/text editor – e.g., Visual Studio Code.
Follow the video tutorial
Don't want to go it alone? Here's the original presentation delivered by our in-house experts to guide you through the steps.
1. Clone the repository
Right, let's do this. In your terminal emulator (Node.js or similar), run the following command from the folder that holds your projects and its assets:
1git clone https://github.com/wix/wix-developers-example-apps.git
What assets?
For the purposes of this demo we've already gathered together a few things you need – e.g., images – and saved them in a folder for you.
The repository should now be cloned to your computer. Change the directory to the 'product of the day' app.
1cd wix-developers-example-apps/product-of-the-day
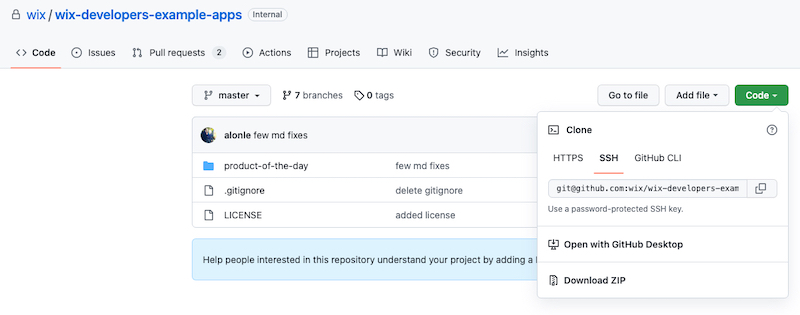
If you don't use Git, you can download a zip file:
- Open up the the Wix repository.
- Click Code in the top right corner.
- Select Download ZIP.
2. Create an app in the Wix Developers Center
a.) Create a new app
- Go to the Wix Developers Center.
- Click Get Started.
- If this is your first app, click Start Building. If you already have an app, click Create New App in the top right corner instead.
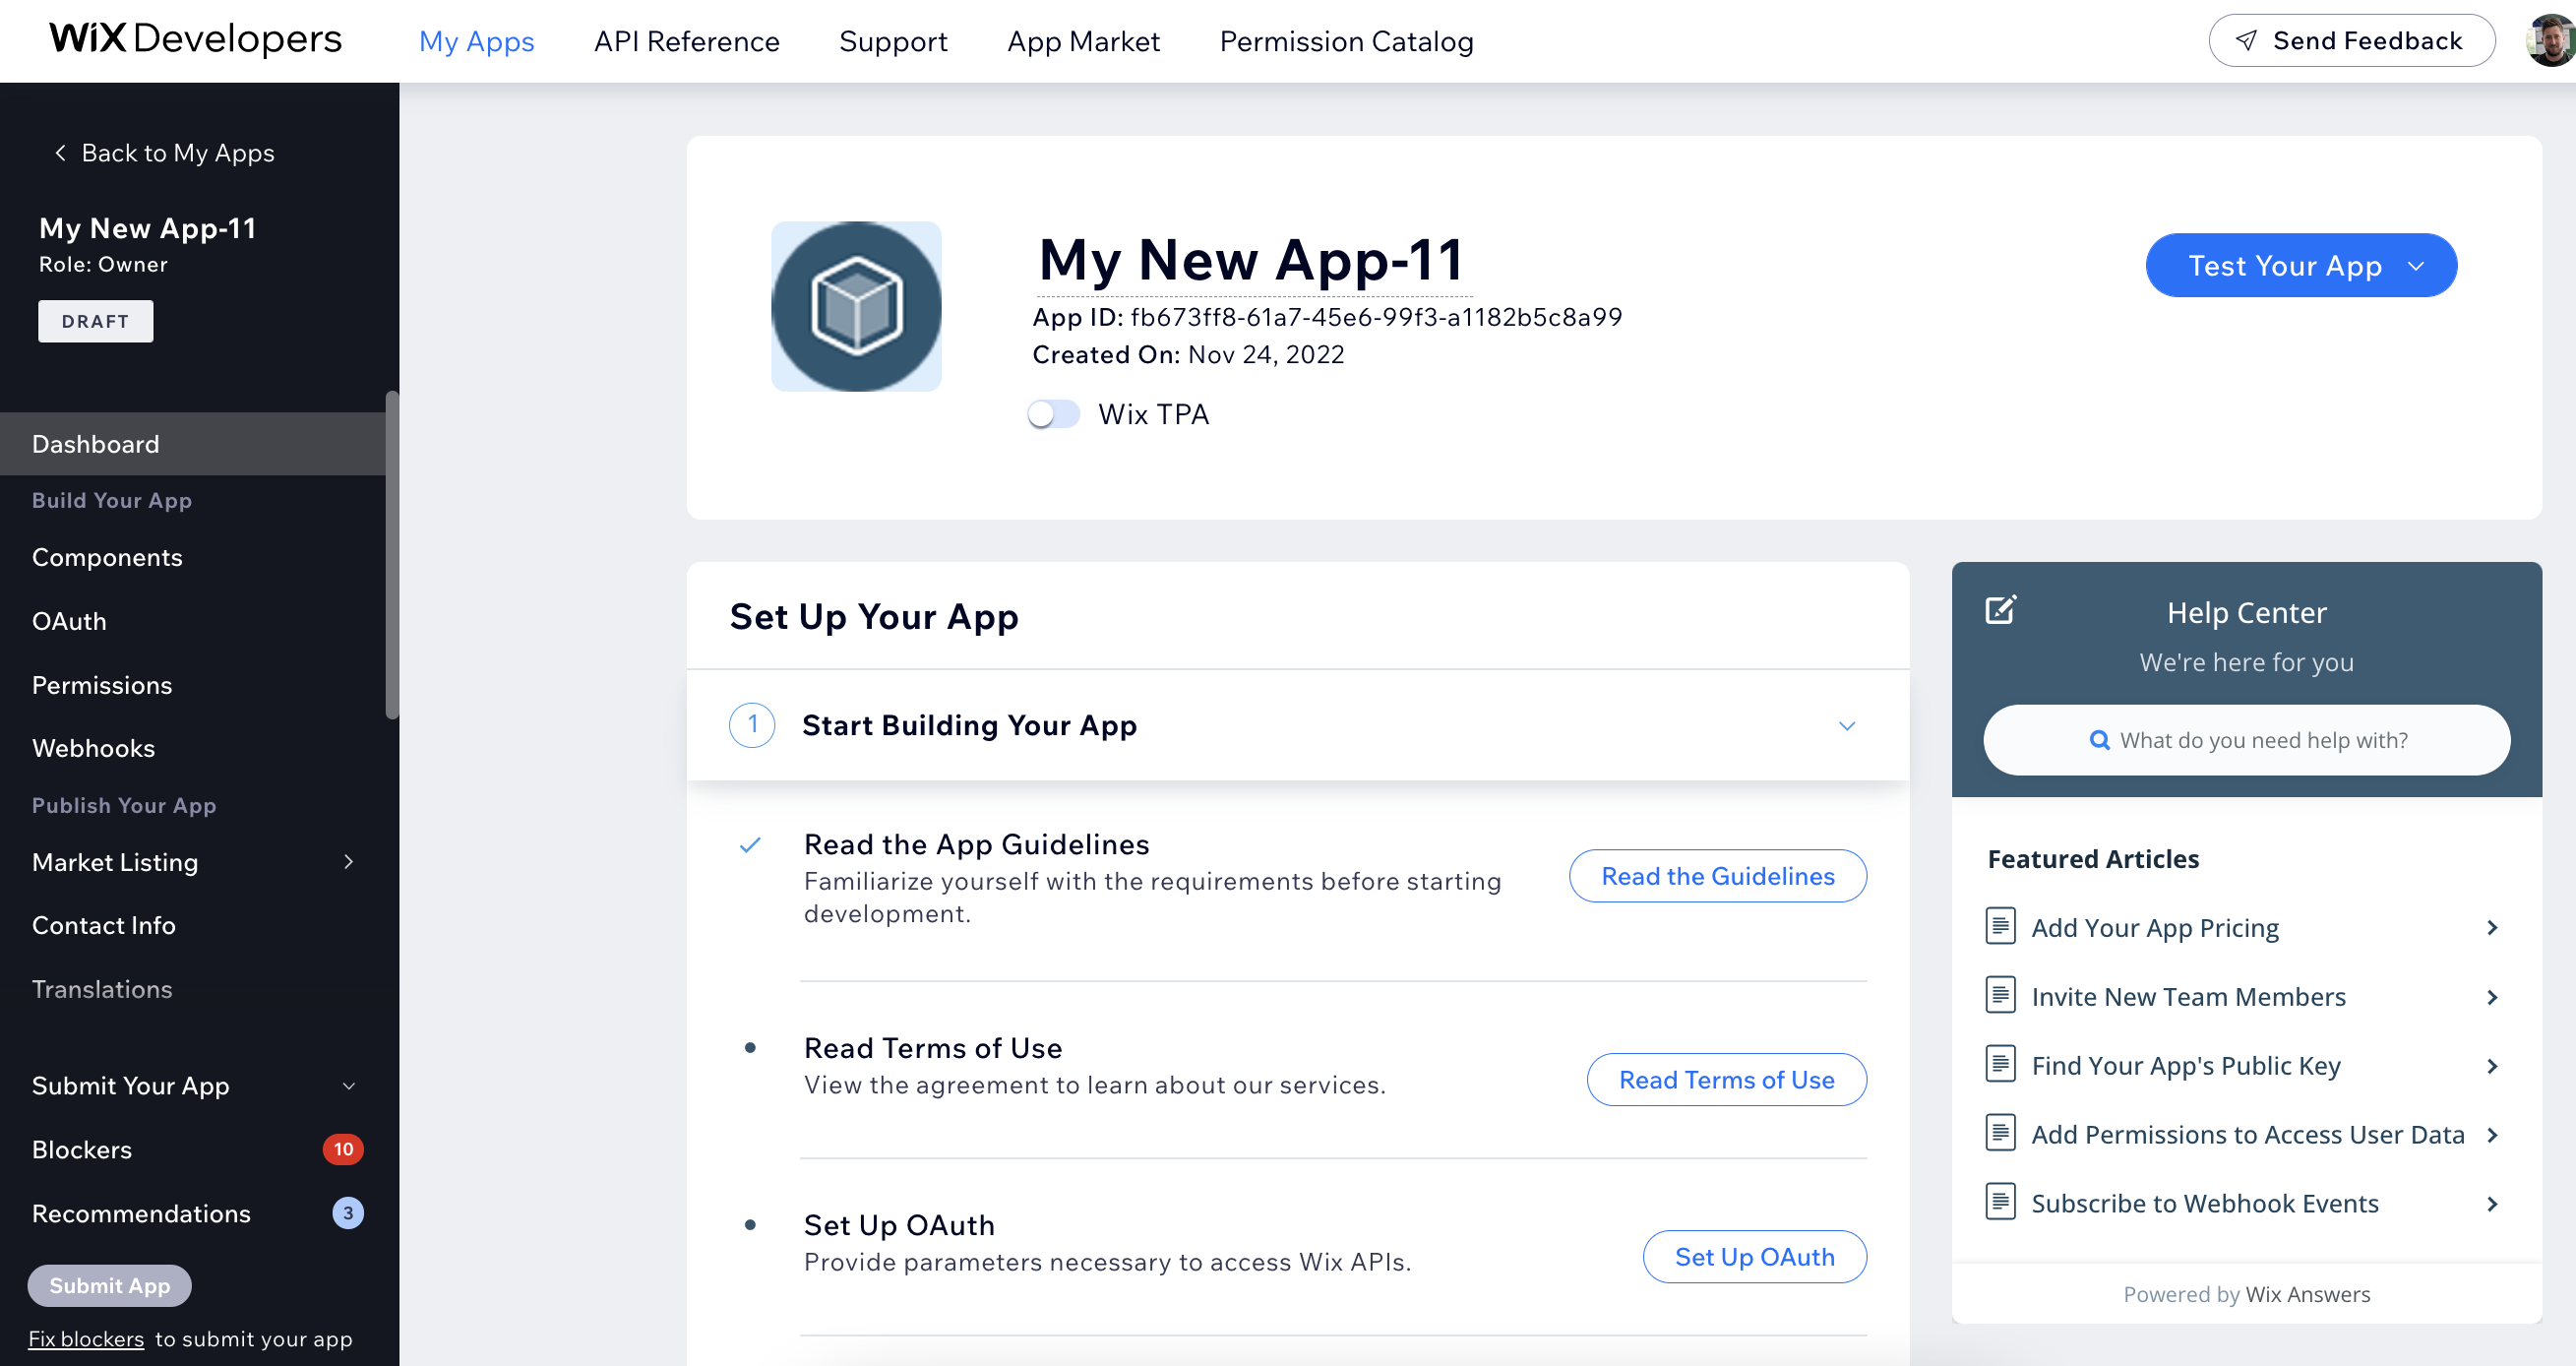
- You should arrive here:
b.) Set up a development site to test your app on
Wix provides a free Premium test site environment to make it easy to see how your app's working. Here's how to set one up:
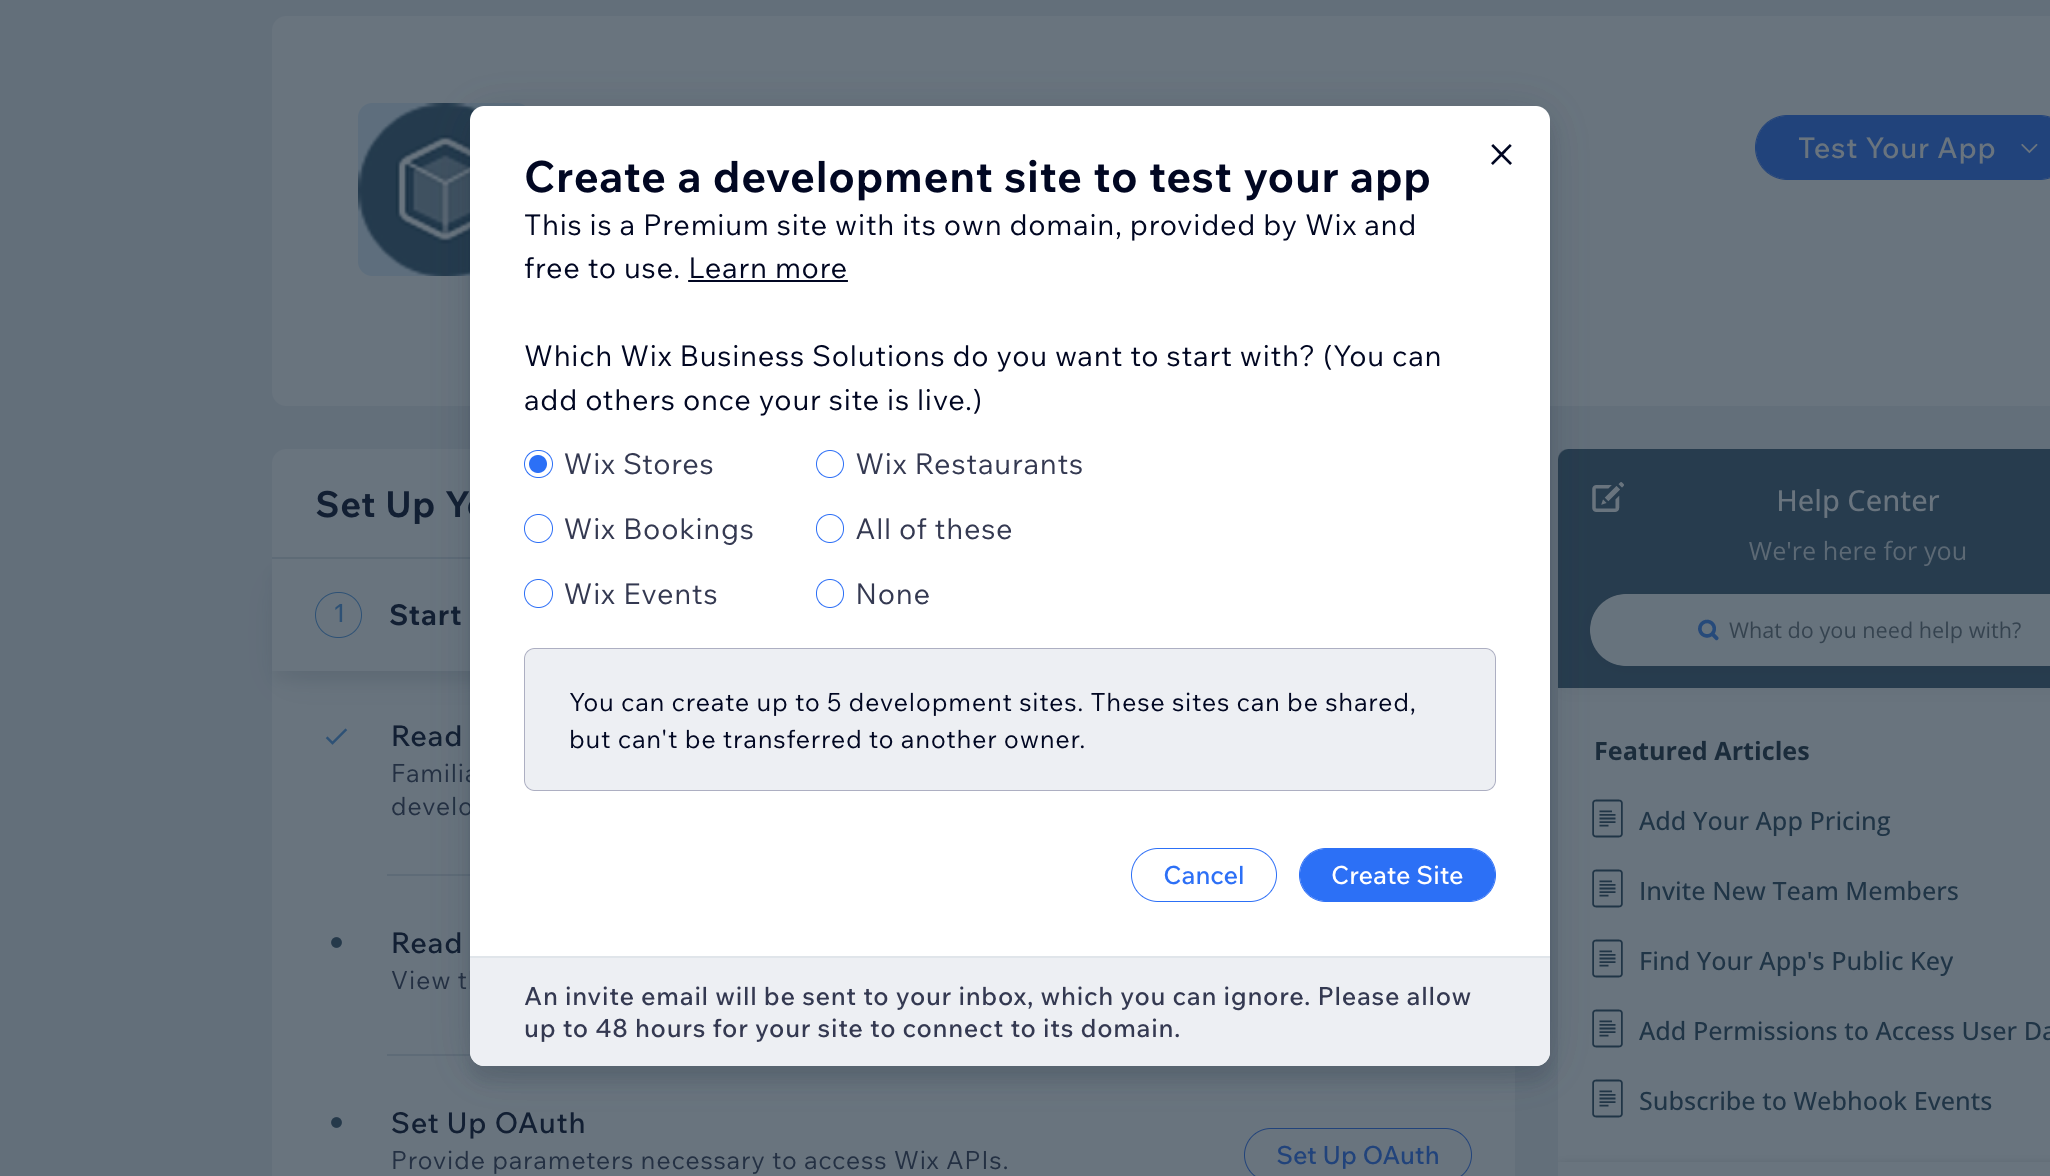
- In the top right of your app dashboard click Test Your App > Create Development Site.
- Make sure Wix Stores is selected, then click Create Site.
- Go to Wix.com.
- Find the development site you just created – it begins with 'Dev Site'.
- Hover over it and click Select Site – this takes you to the site's business manager.
- Click Edit Site.
- Click Publish in the top right of the site's Editor.
- Your test site should now be live – nice work.
3. Find the right APIs
Wix has a big collection REST APIs that let developers access the Wix site and user data they need for their app to work. For this app you need three APIs:
- Query Products – this lets the app locate and select the 'Product of the Day'.
- Create a Coupon – this lets the app generate a discount coupon for the site owner's chosen product and discount percentage.
- Send Message – this lets us communicate the coupon to the site visitor in the Wix Chat widget.
Keep them handy
You don't need to use these right now – that comes later – but familiarise yourself with them, and keep the tabs open.
4. Add permissions
Now that you've found the APIs, you need to add some permissions. Permissions are how a user grants your app consent to access their data. To add permissions:
- Go back to your app in the Wix Developers Center.
- Click Permissions in the side menu (under Build Your App).
- Click + Add Permissions.
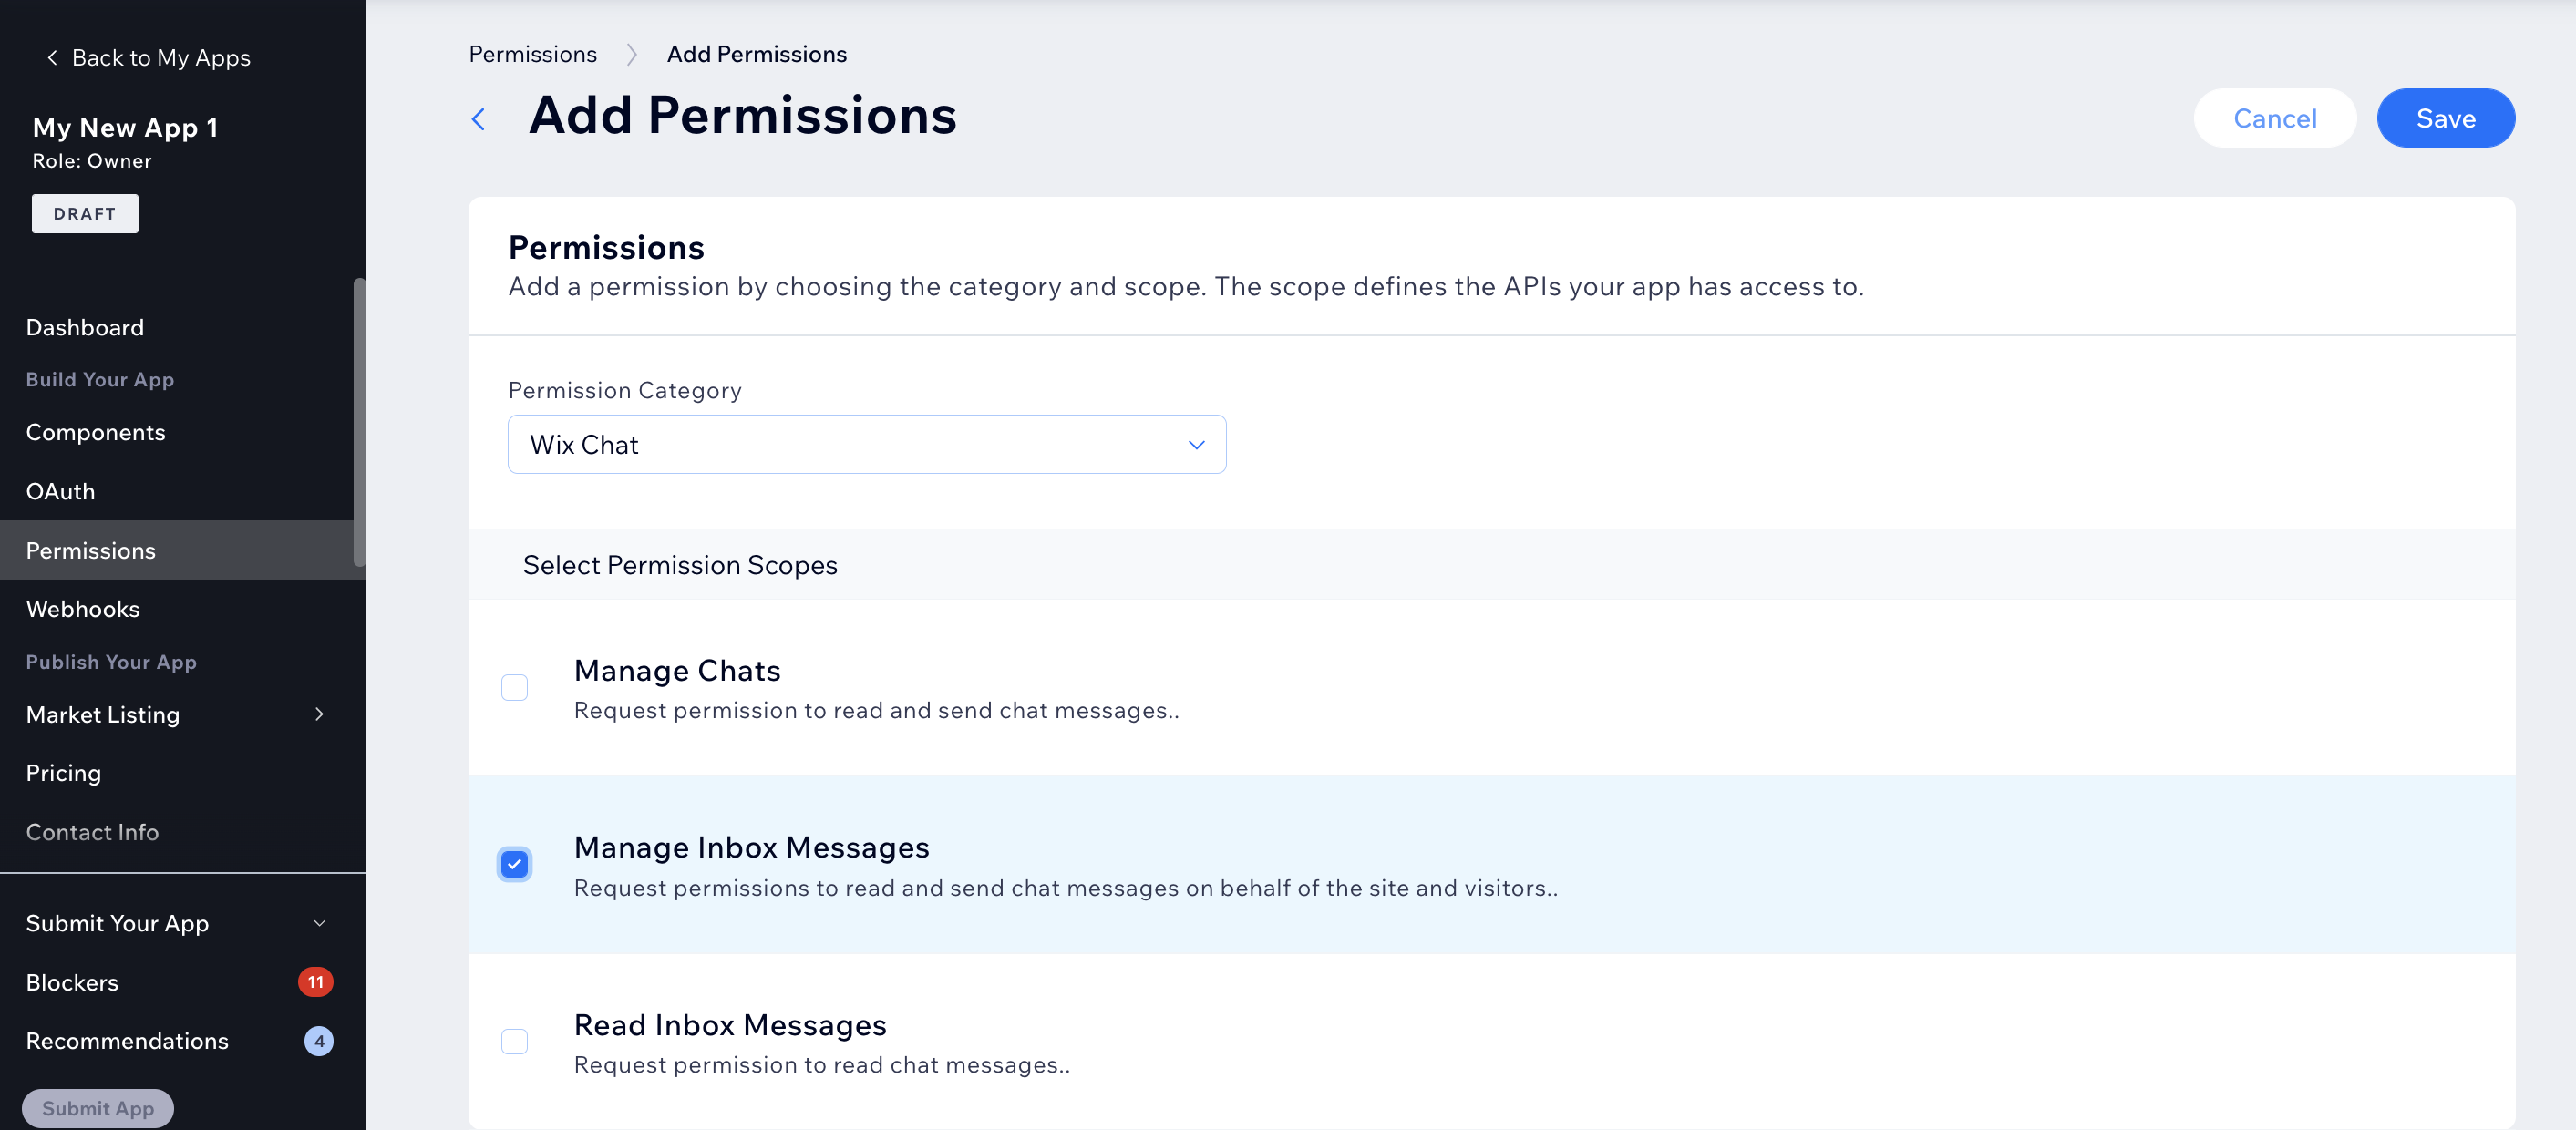
- Choose the relevant Permissions Category, and then select the Permission Scope.
- Add Wix Stores > Read Products
- Click Save.
- Repeat the process for the next two permissions.
- Add Coupons > Manage Coupons, click Save.
- Add Wix Chat > Manage Inbox Messages, click Save.
Tip:
You can see which permissions you need for each API in the documentation.
5. Create a dashboard component
A dashboard component is where a site owner / app user manages the app – this exists on the backend and won't be visible on the live site.
a.) Start the client React.js project
- Go to the client folder in the terminal.
1cd client
- Run one of the following to install js packages:
1yarn
Or:
1npm install
3. Once the installation is complete, start the client on port 3000.
1yarn start:secure
Or:
1npm run start:secure
4. The command run start:secure will open https://localhost:3000 in your browser and you'll encounter a security warning – this is because you don't have a certificate for your localhost machine.
5. Click Advanced
6. Click Proceed to localhost (unsafe)
7. You should now see the dashboard UI:
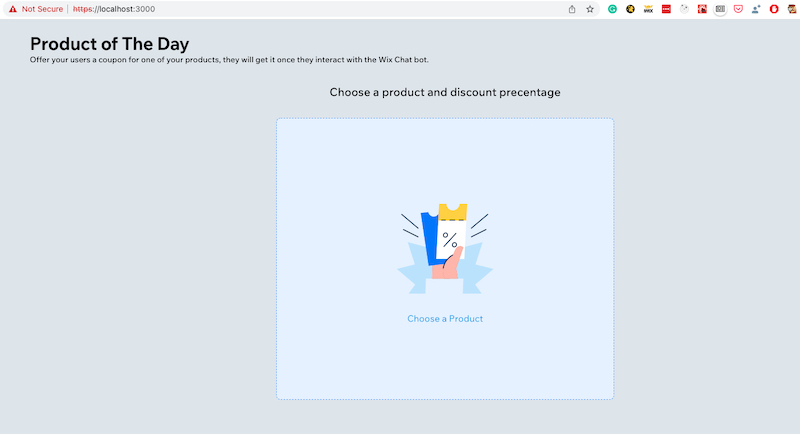
b.) Add a dashboard component to your app in the Wix Developers Center
- Go back to your app in the Wix Developers Center.
- Click Components on the side menu.
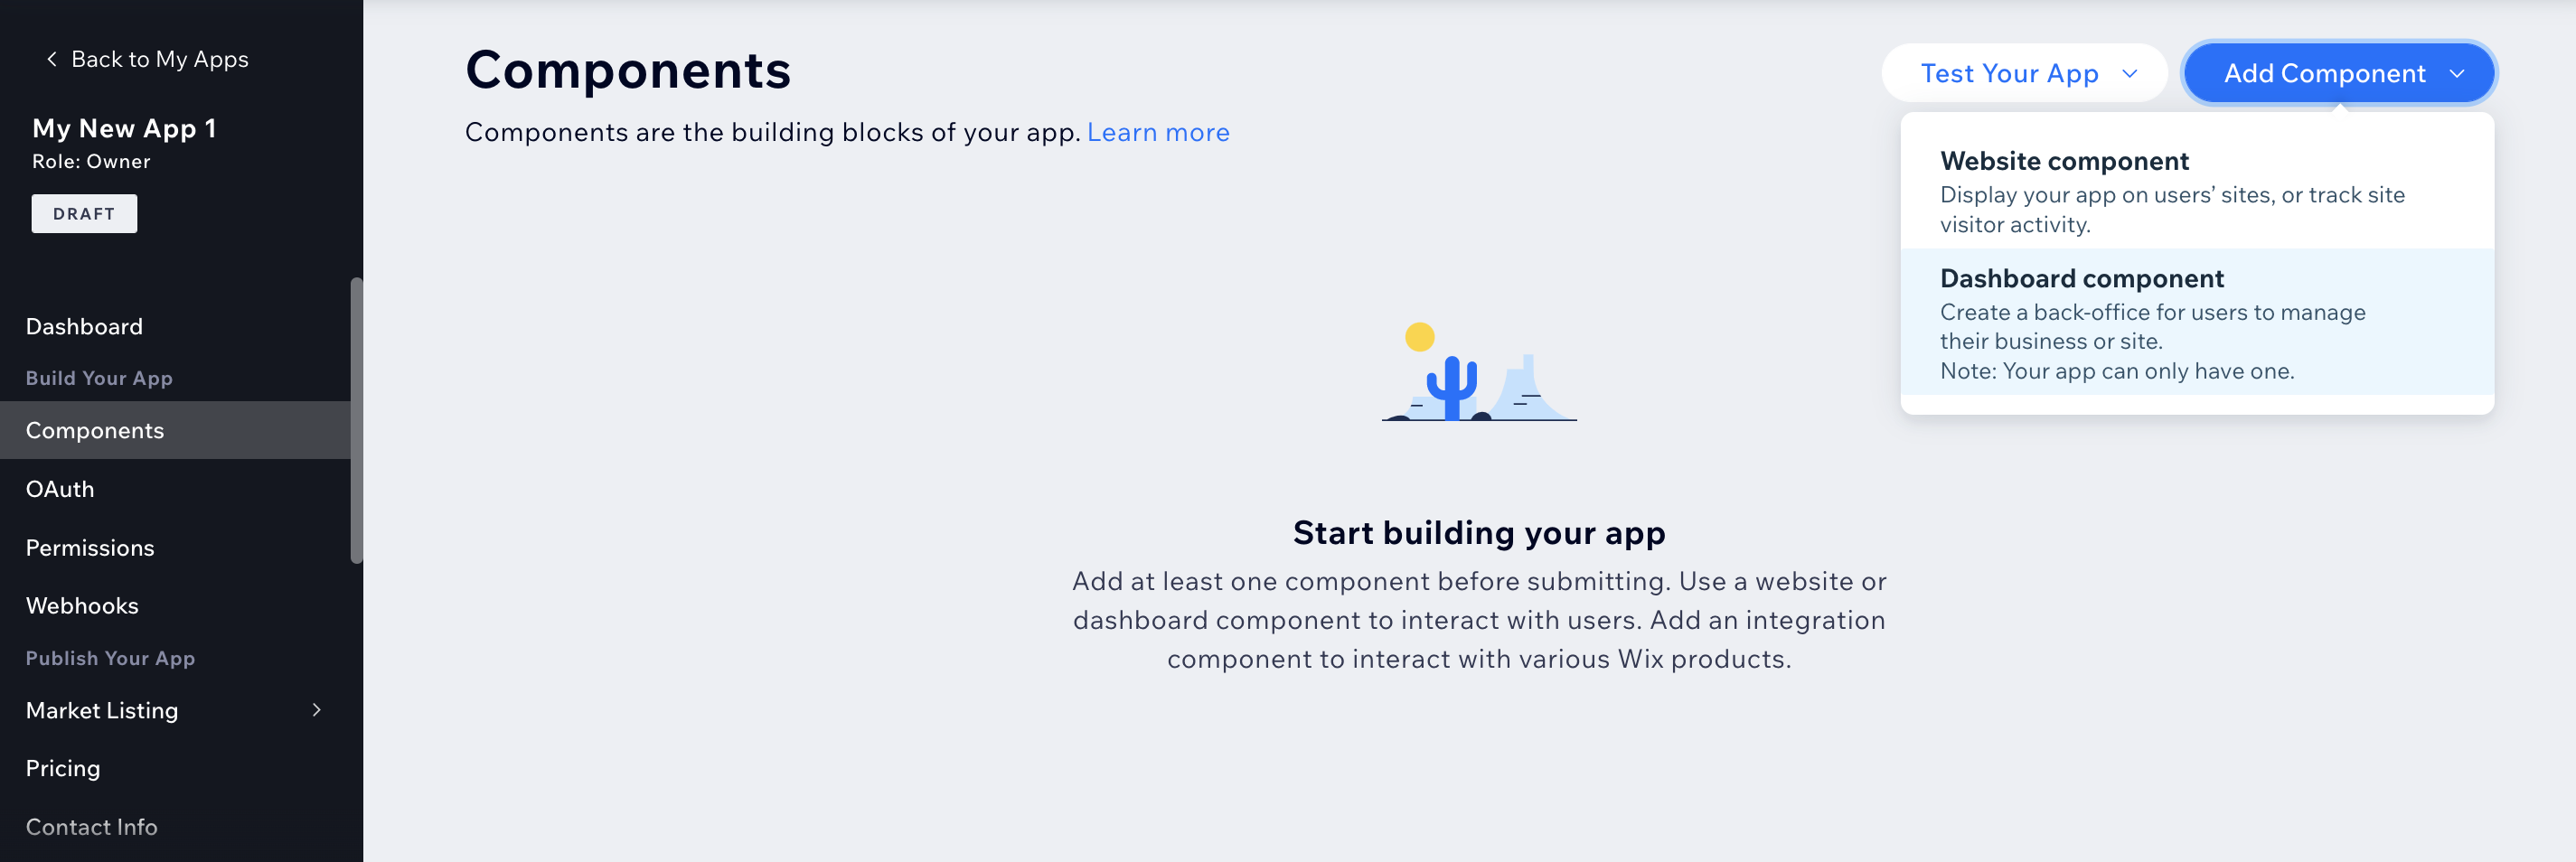
- Click Add Component in the top right corner.
- Select Dashboard component.
- Paste https://localhost:3000/ into the Page URL field.
- For a seamless experience, we recommend integrating your app's dashboard into the user's Wix Dashboard.
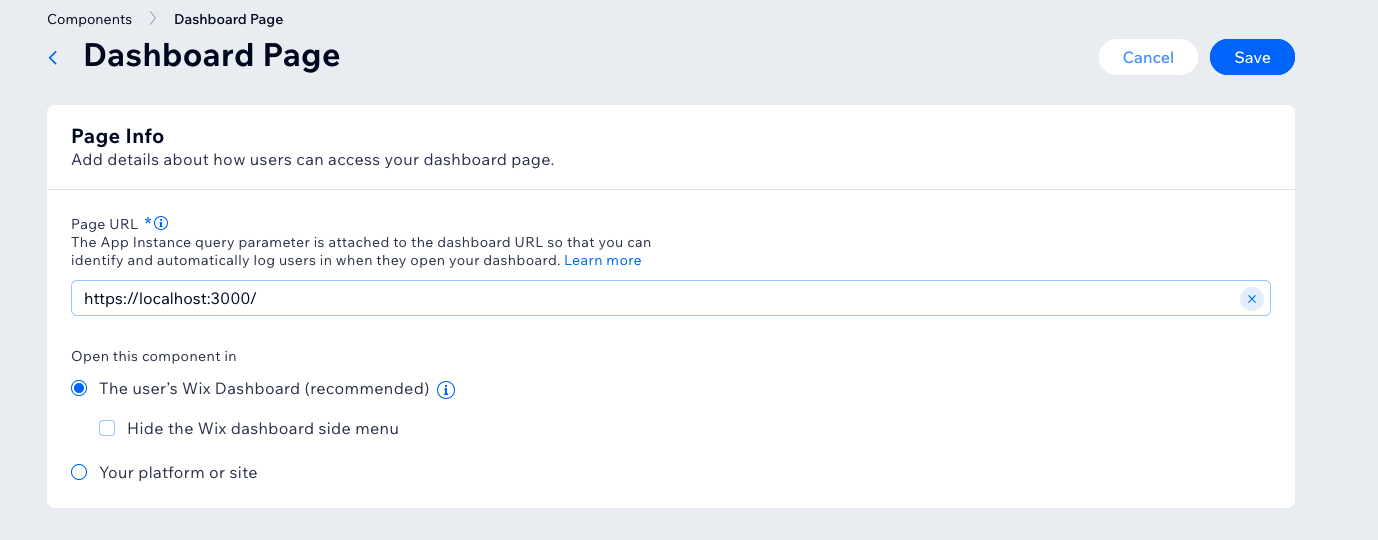
- Click Save.
6. Configure OAuth
Wix uses OAuth 2.0 to authorize apps to access our APIs and apply webhooks. OAuth is an authentication protocol that lets users approve one application interacting with another without needing to give away their password.
a.) Start the Node.js server
Now we need to start the server side of the code:
- Go to the server folder in a new terminal:
1cd server
- Run one of the following to install js packages:
1yarn
Or:
1npm install
3. Under the server folder run the following command to create a .env file from the example.env.text:
1cp example.env.txt .env
4. Replace the APP_ID and APP_SECRET parameters in the .env file by taking them from the OAuth page of your app in the Wix Developers Center. It should look like this:

5. Skip the WEBHOOK_PUBLIC_KEY parameter for now (you'll replace it on the next step).
6. After the installation ends successfully and you have the .env file ready with your APP_ID and APP_SECRET parameters it's time to start the server. Run the following command:
1yarn run start
Or:
1npm run start
7. In the terminal you'll get something similar to this:

8. You need the AppUrl and RedirectUrl you received in the terminal for the next step, so keep them handy.
Useful server commands
- Stop the server: yarn run stop / npm run stop
- See the server logs: yarn run logs / npm run stop
- Delete the server from pm2: yarn run delete / npm run delete
- Run tests: yarn run tests / npm run tests
b.) Configure OAuth in the Wix Developers Center
- Go to your app in Wix Developers Center.
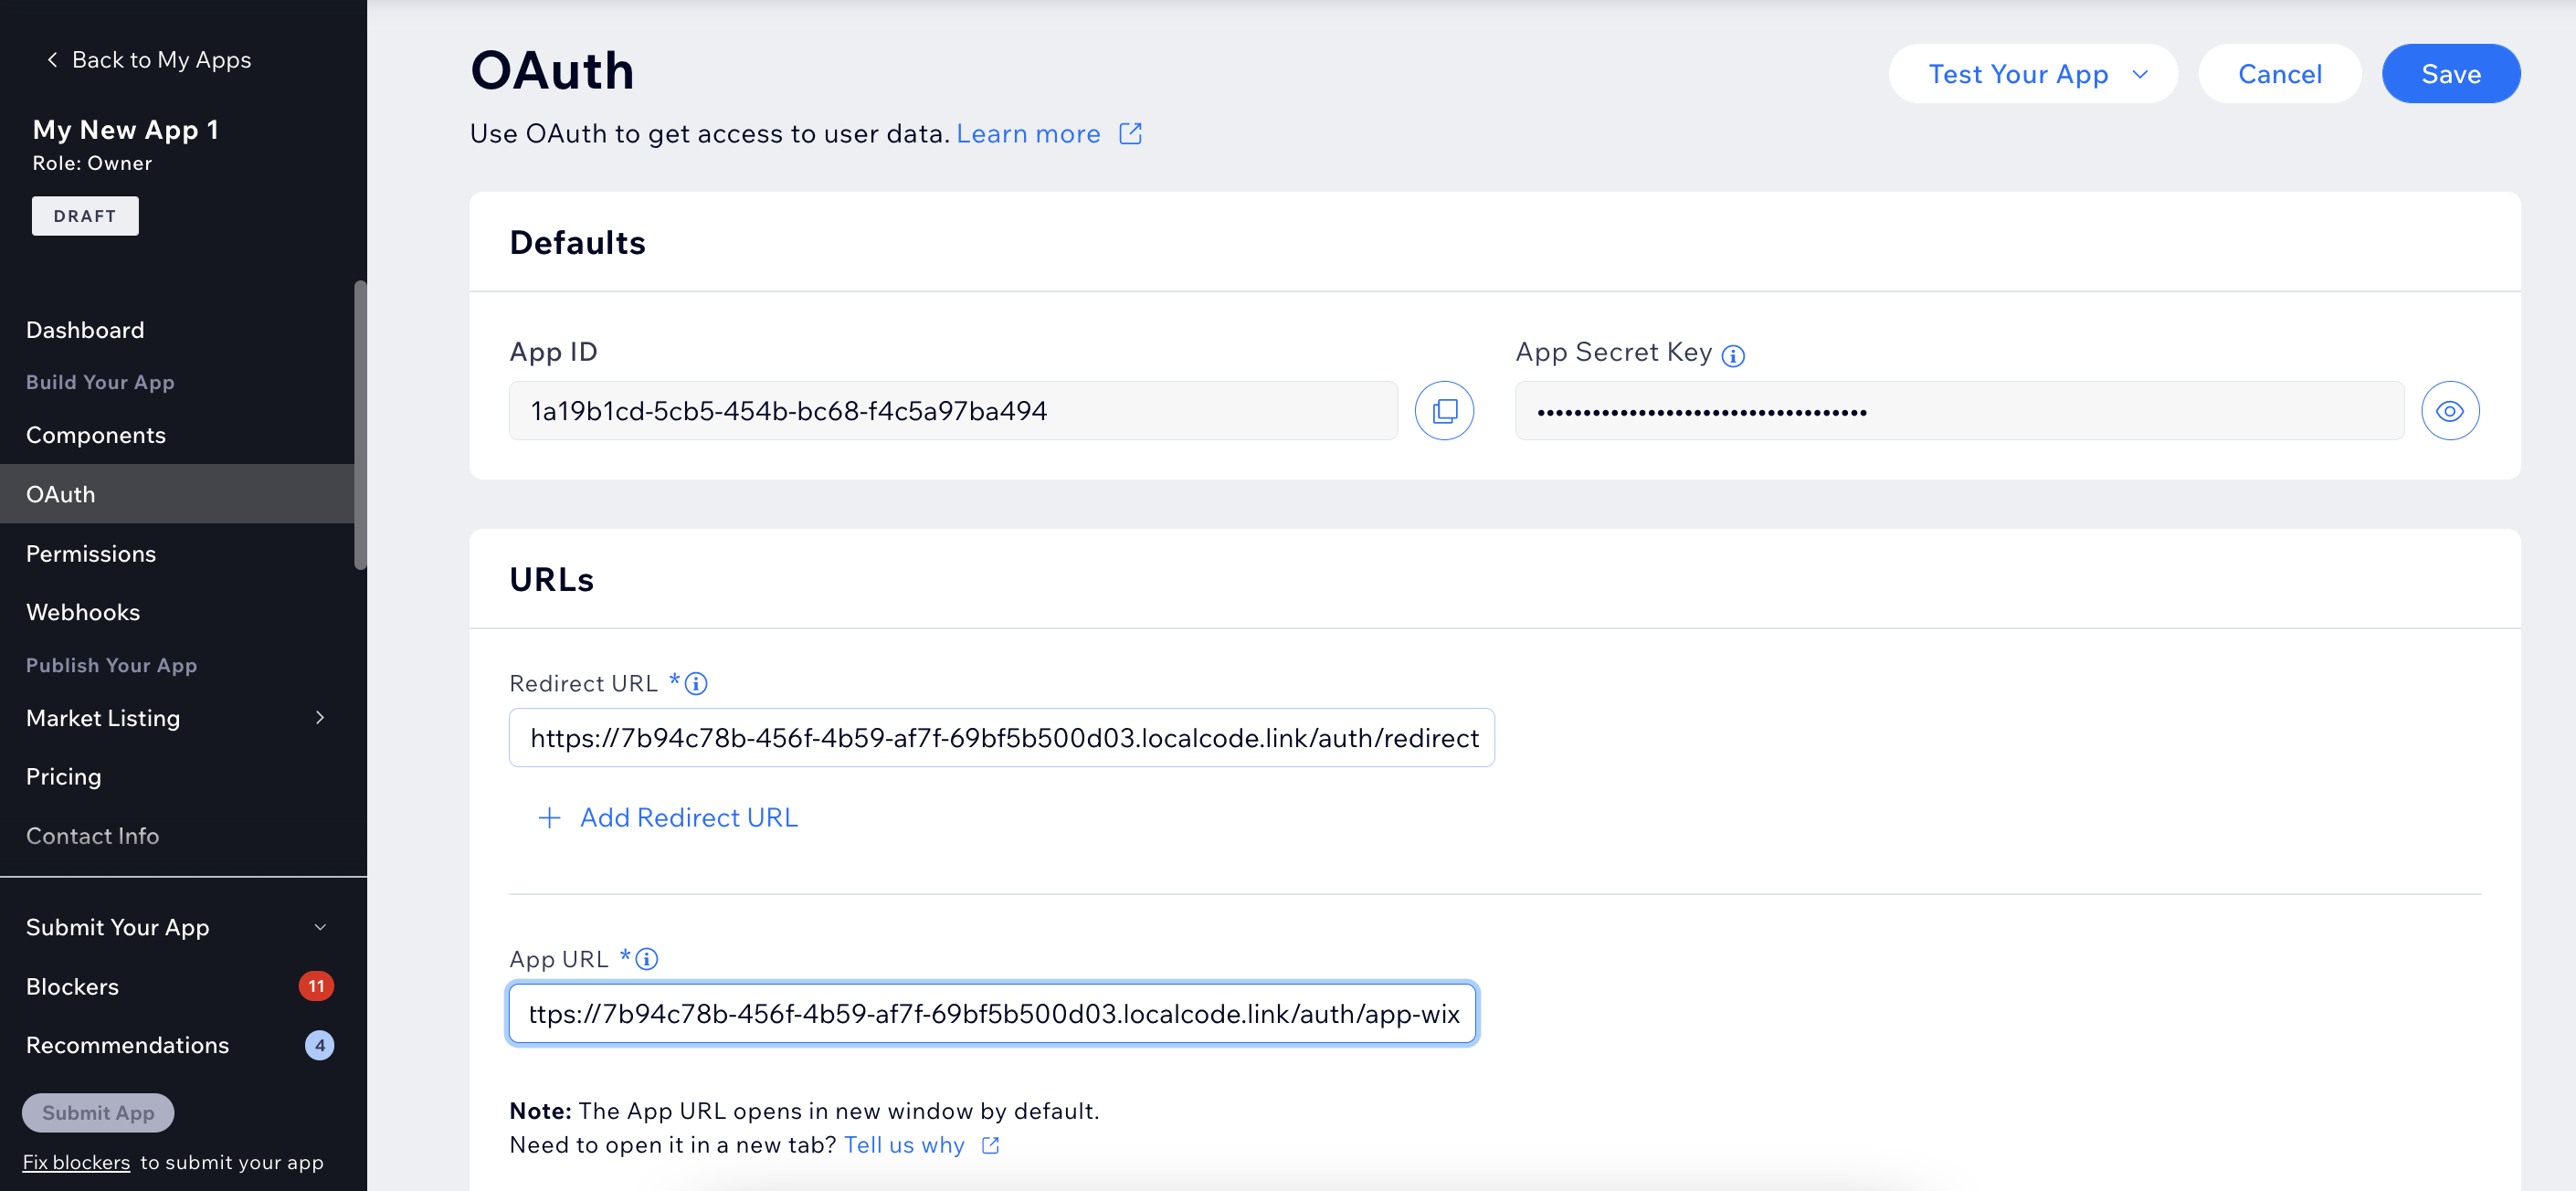
- Go the OAuth page in the side menu. In the URLs section insert the Redirect URL and App URL you copied from the terminal output you got in the previous step. It should look like this:
7. Add webhooks
Webhooks are designed to deliver notifications about events in your app, other apps, or the Wix site as and when they happen.
a.) Find the webhook you need
For this app we need the Message Sent To Business Webhook. Take some time to read the documentation, including the permissions this webhook requires (these are added automatically when you add the webhook in the next step).
b.) Add a webhook to your app
This app needs to receive a webhook for every new message a site visitor sends in the Wix Chat widget. Here's how to configure it:
- Go to your app in Wix Developers Center
- Go to the Webhooks page in the side menu.
- Click Add Webhook.
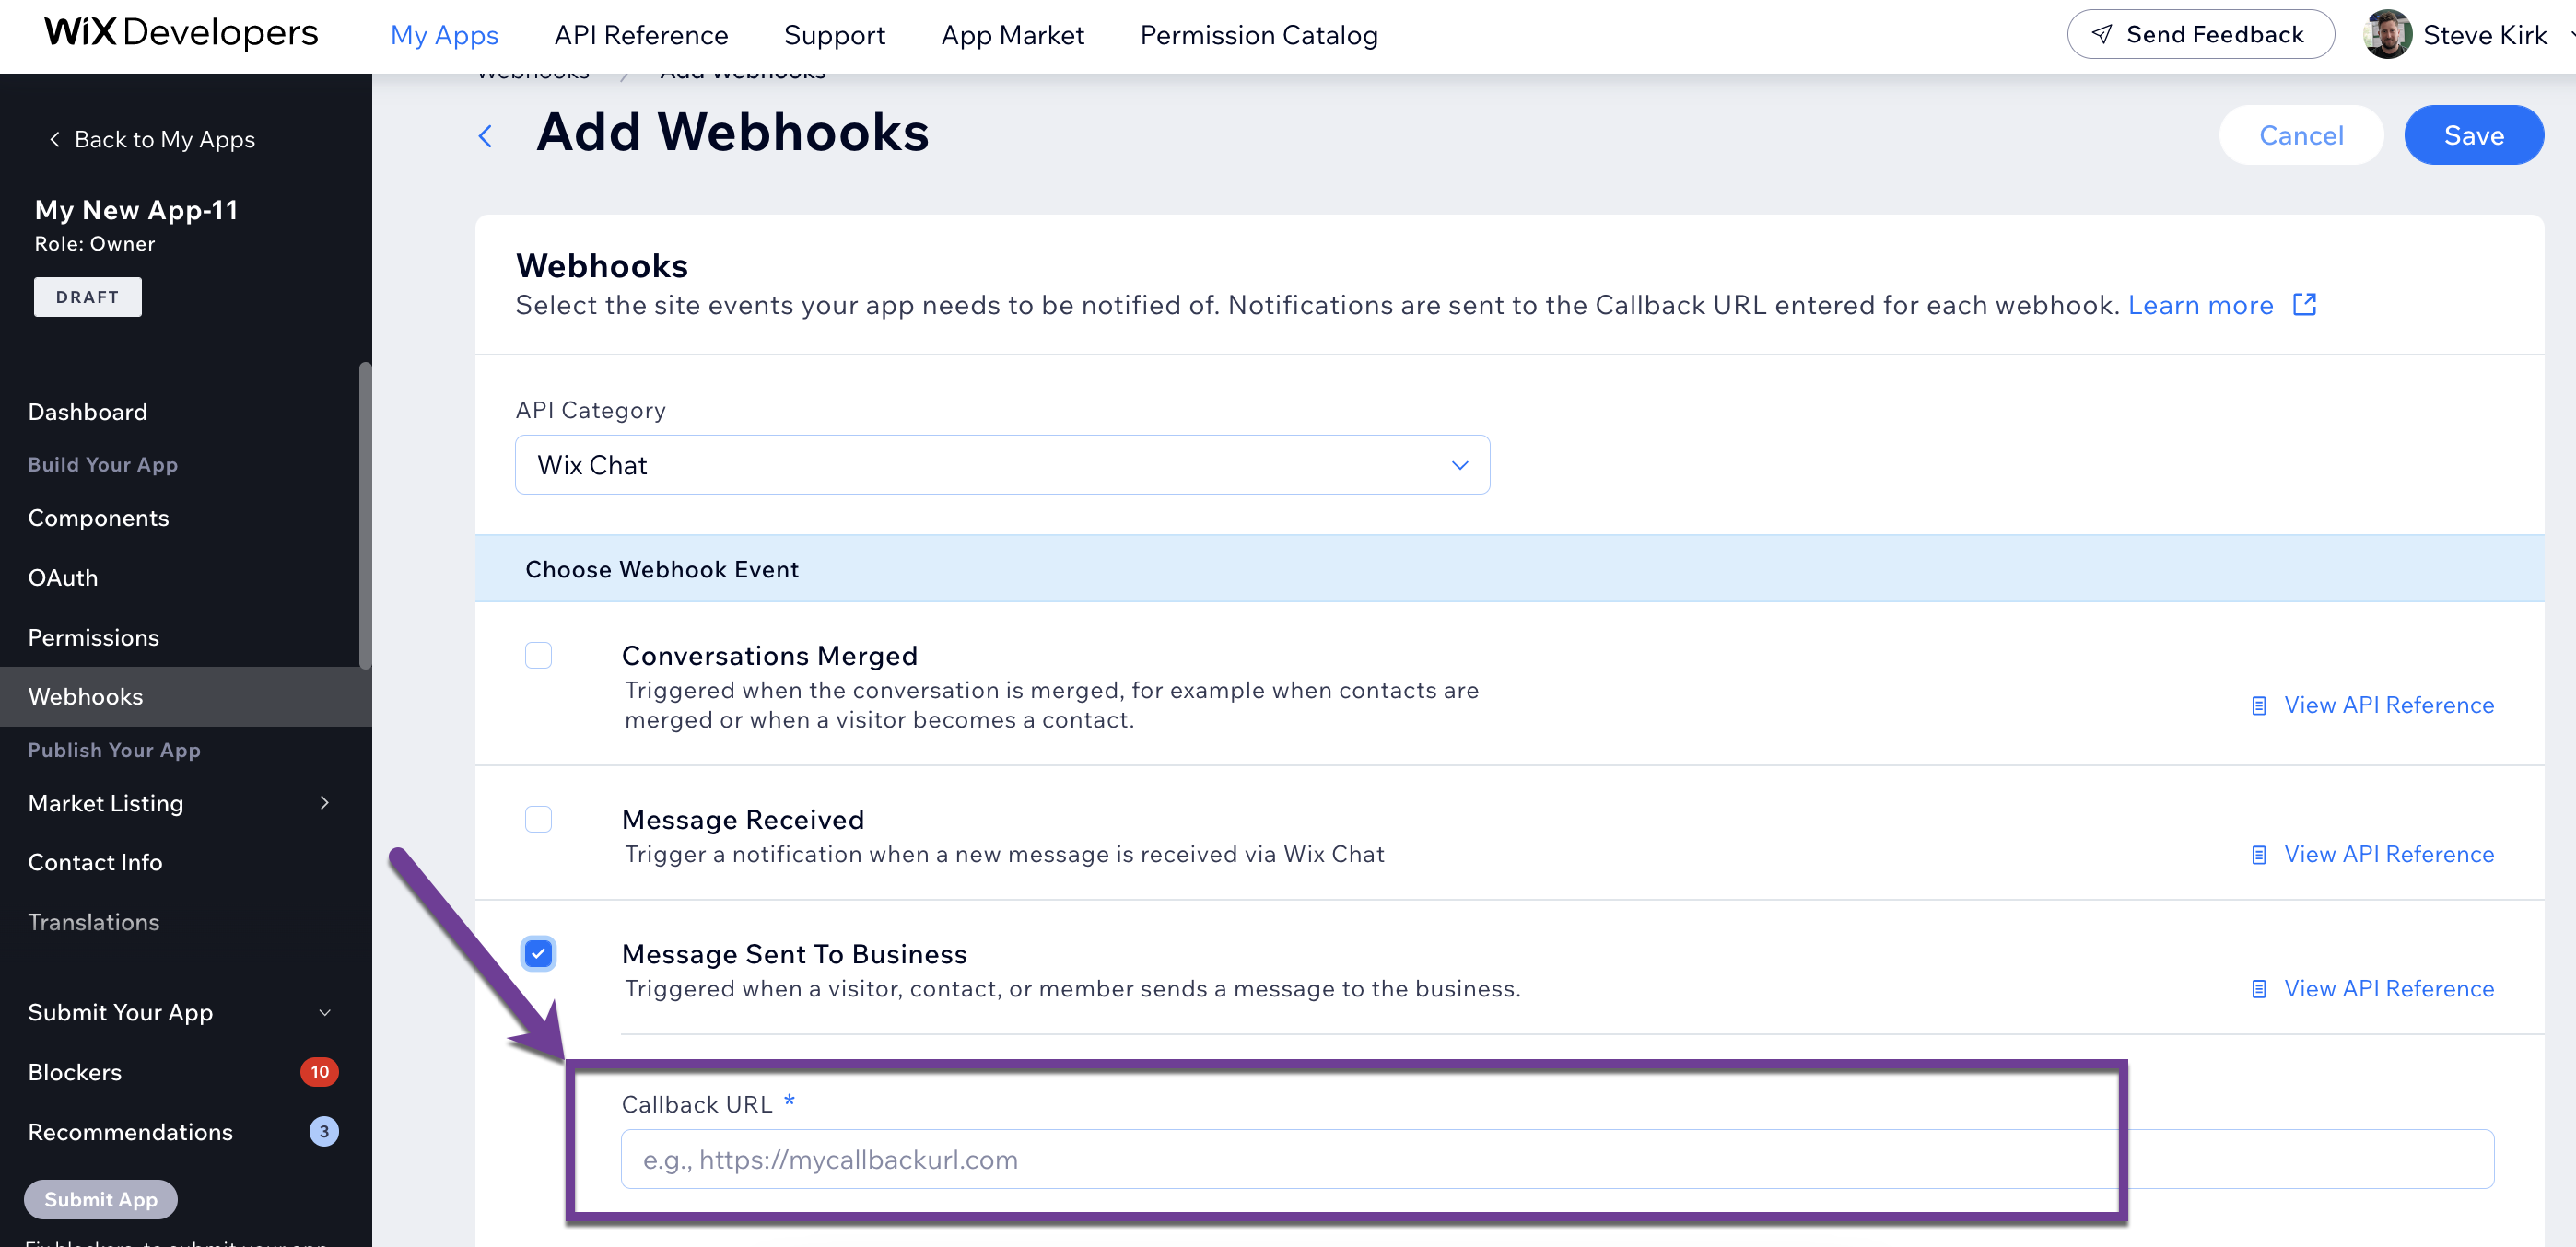
- In the API Category dropdown select Wix Chat > Message Sent to Business
- Once you've started the node server you should see a printed output in the terminal. Copy the result of the Message received webhook: output and paste it into the Callback URL field. It should look like this:
- Click Save.
c.) Replace the webhook public key in the .env file
- Go to the Webhooks page of your app in the Wix Developers Center
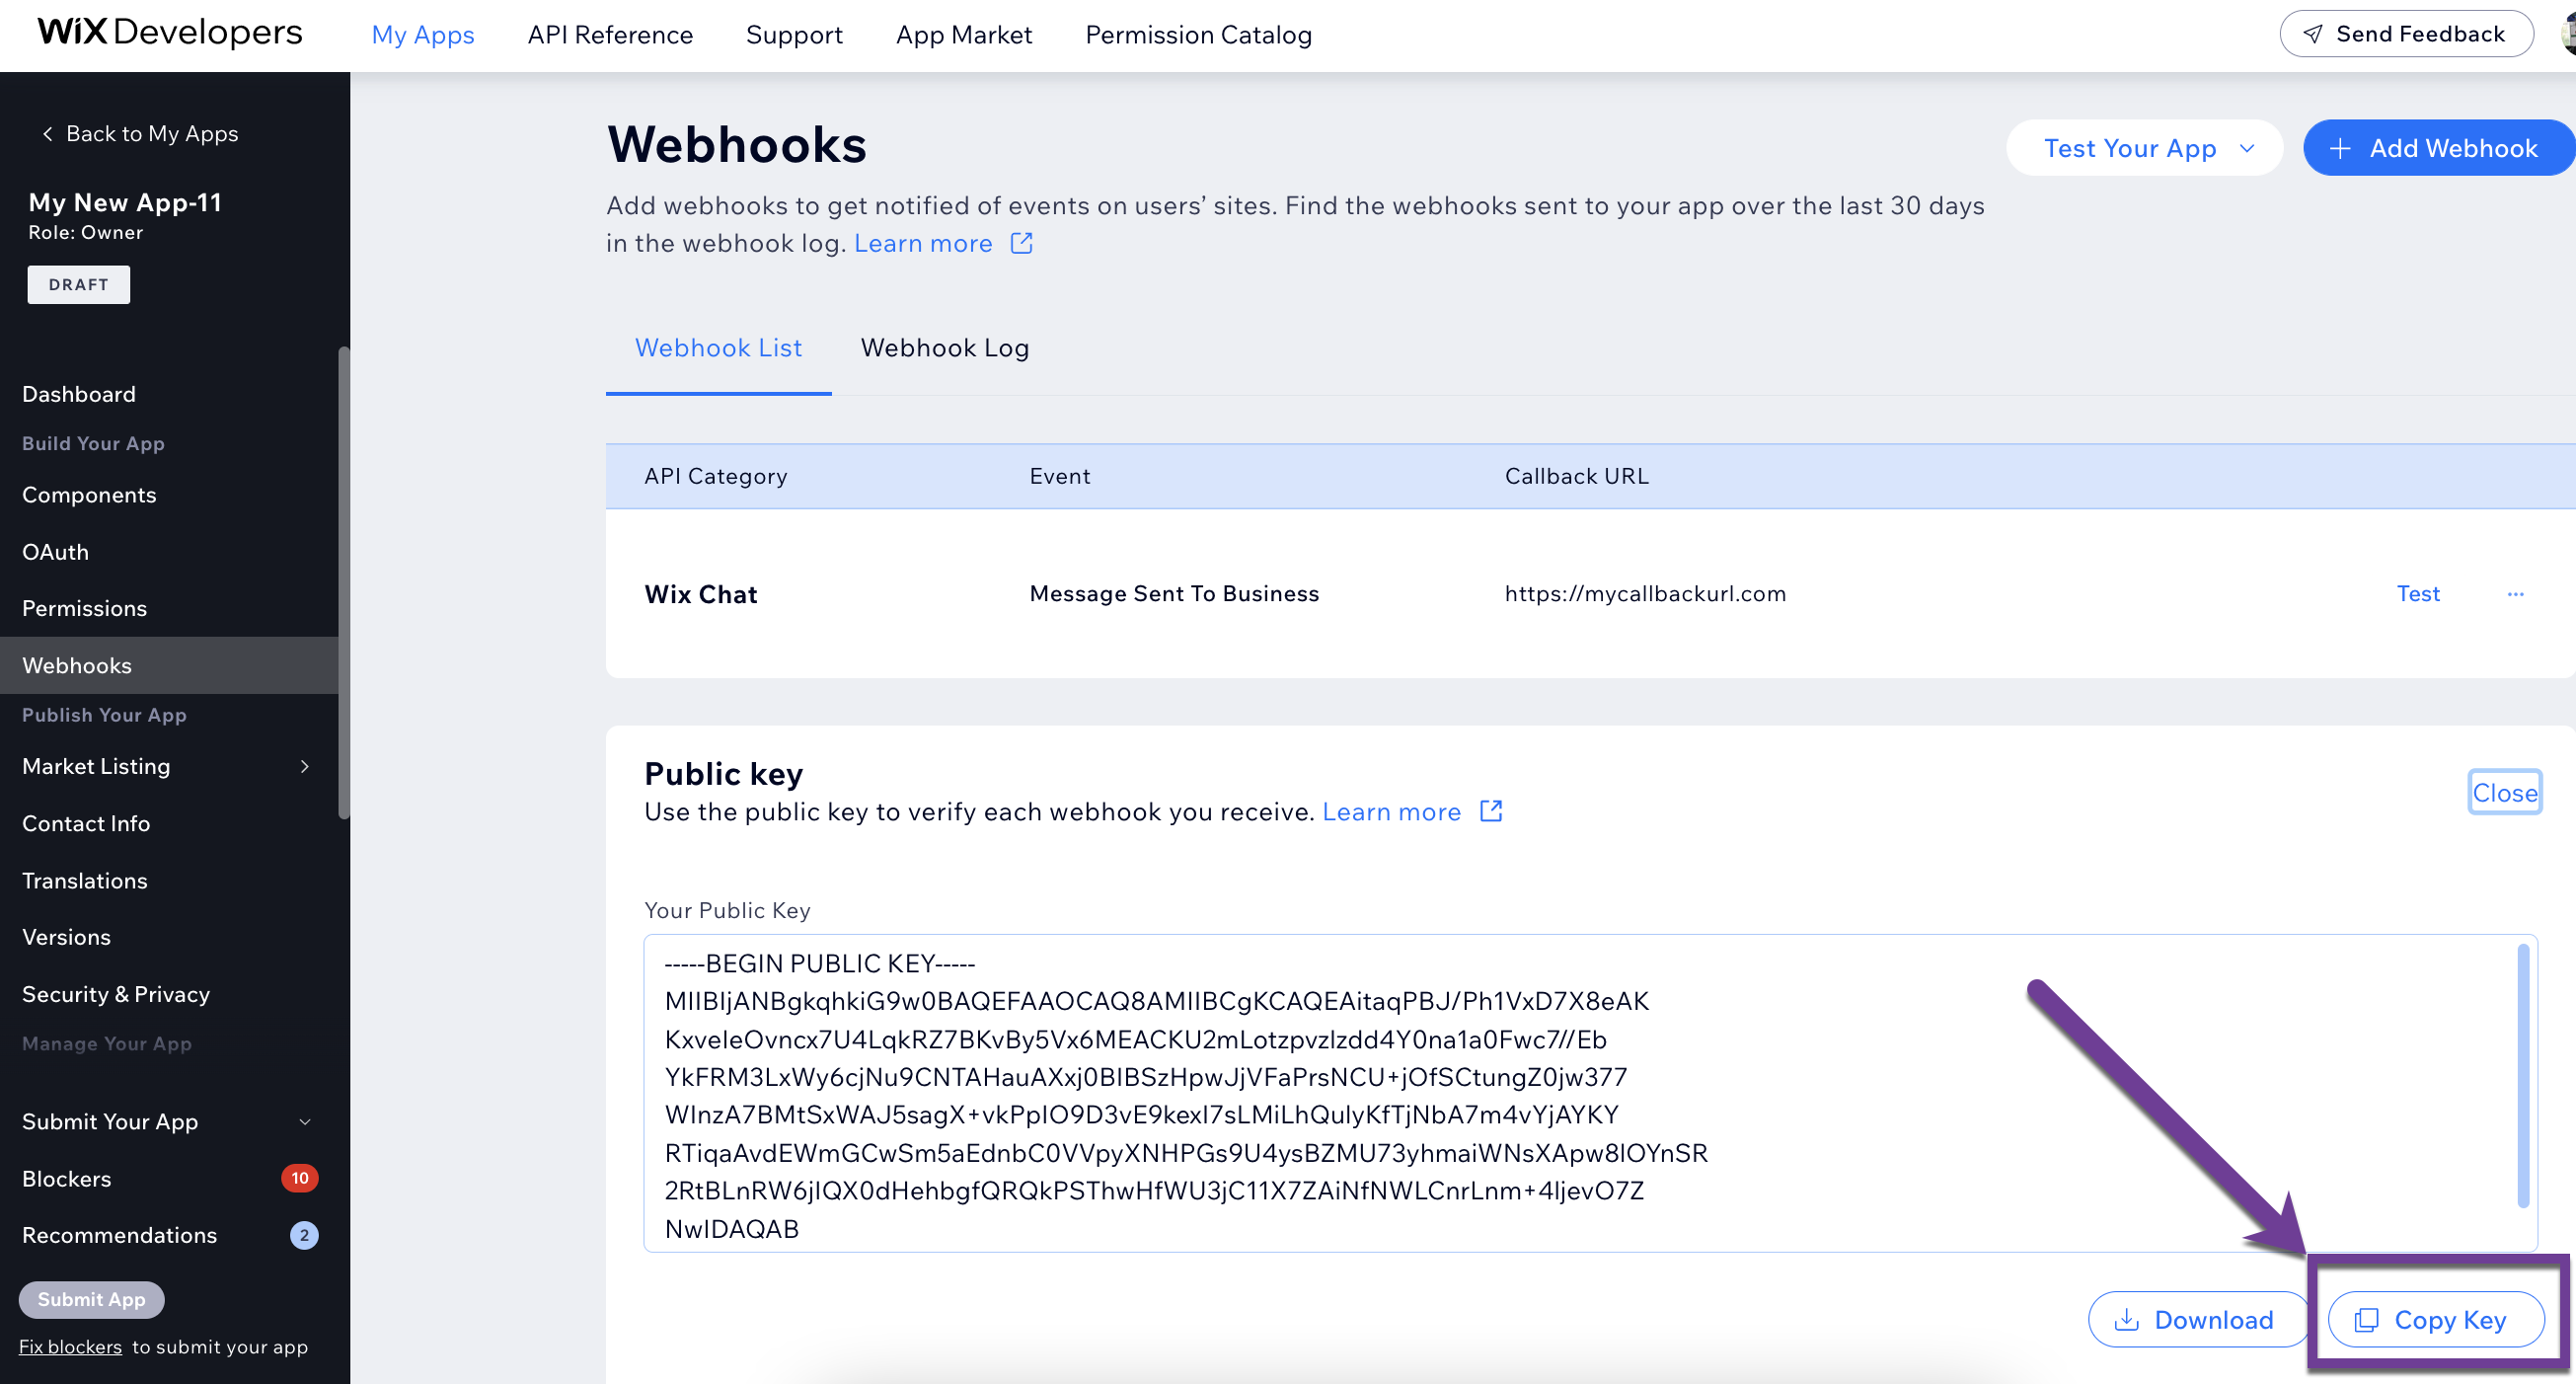
- Click to open the Public key field and click Copy Key. It should look like this:
- Open the .env under the server folder.
- Replace the WEBHOOK_PUBLIC_KEY parameter.
- Restart the server by running under the server folder in the terminal: yarn run stop and yarn run start / npm run stop and npm run start
8. See the app in action
a.) Install the app on the development test site you created earlier
- Go to your app in the Wix Developers Center.
- Click Test Your App and select App Market.
- Click Add to Site.
- Select the Wix Stores development site you created earlier and you'll be redirected to the app installer.
- You'll be shown the app's required permissions (this is where users consent to the permissions you created earlier).
- Click Agree and Add.
b.) Add a product page in the Editor
- Click Pages & Menu in the Editor side menu.
- Choose Store Pages > Product Page.
- Click + Add Shop Page.
c.) Configure the app in the dashboard
- Go to My Sites and click Select & Edit Site on your development site.
- Go to Apps in the side menu and select your app to open its dashboard.
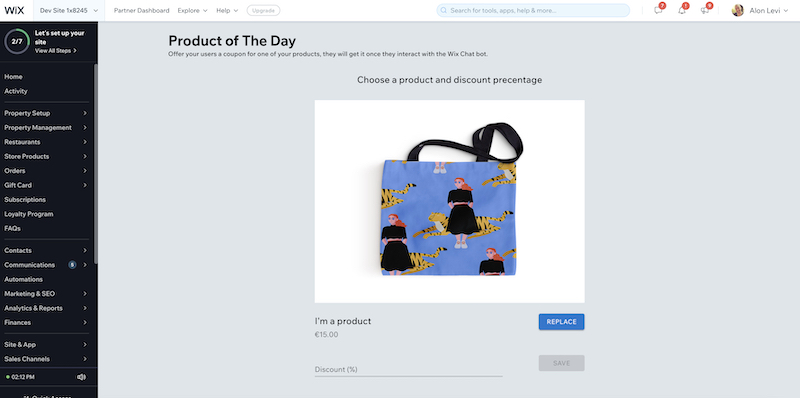
- Type 'I'm' into the product search bar.
- Select a product and insert a Discount Percentage.
- Click Save. This is what it looks like:
d.) Write a message in the Wix Chat widget and return a coupon
- In the site business manager find the live site URL:
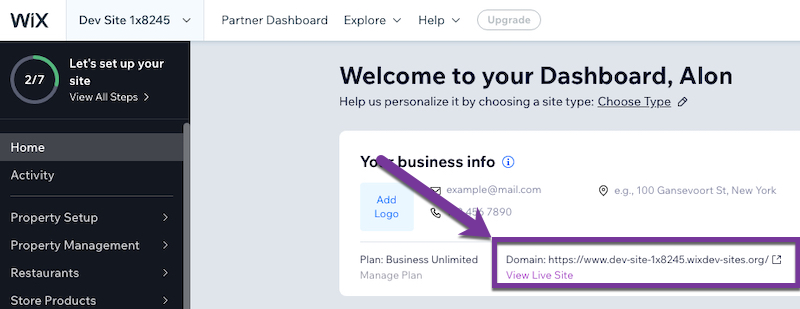
- Click View Live Site.
Site not loading?
As you've just created a brand new domain, it can take a while to kick in. If the site isn't loading at this stage, try again later on.
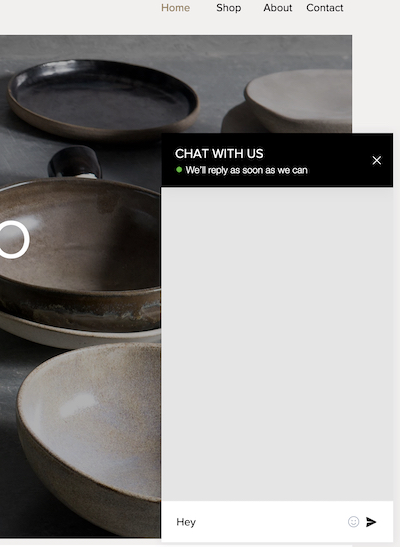
3. In your live site, open the chat widget and type 'Hey' or similar:
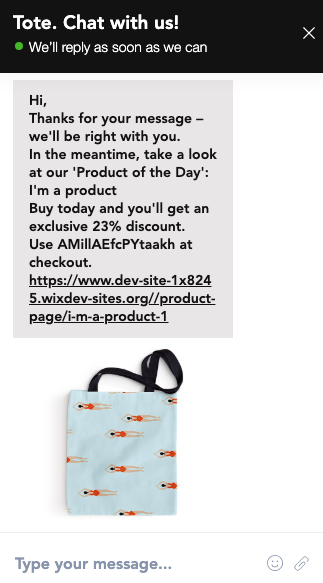
4. If your app works you'll get response with a coupon to the product of the day you chose in the app dashboard:
e.) Use the coupon to get a discount on the product of the day
- Copy the coupon code from the response.
- Click the link to Product of the Day.
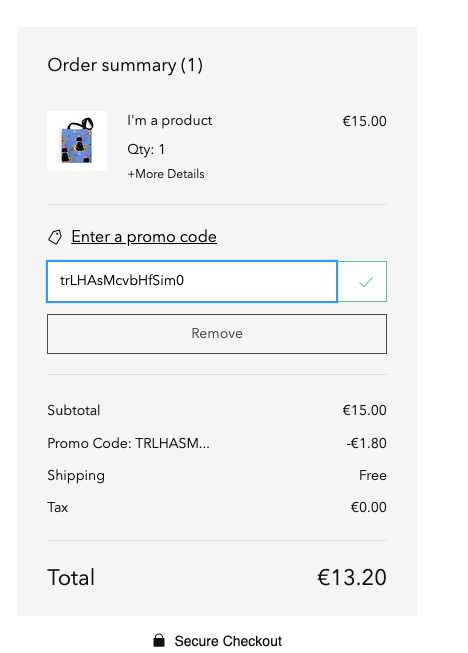
- Add the Product of the Day to the cart and go to the checkout.
- Add the coupon code and check that you got the Discount Percentage you added earlier on.
9. Adjusting the code
To round things off, we will briefly dive into the code and add some missing information. This will help you understand how the code works when you're building your own app.
We intentionally left out the coupon sent date (which is how our app generates a product of the day coupon for each message). Let's fix that.
We intentionally left out the coupon sent date (which is how our app generates a product of the day coupon for each message). Let's fix that.
a.) Save the coupon data by conversion Id and date
- In our code find the file ProduceOfTheDayService.js.
- Create the date format by adding dayJs at the top of the file:
1const dayjs = require('dayjs')
- In the sendCouponOfTheDay function add:
1const today = dayjs().format('DD/MM/YYYY')
- Use this today variable, the conversationId and coupon data to save it in the coupon database:
1this.couponsDao.save(instanceId, conversationId, today, couponData)
b.) Check if the visitor got a valid coupon for the current date
In the same file and function sendCouponOfTheDay we need to add a condition not to send the coupon and avoid generating a new one.
- Check if coupon for this conversion Id and date exist on our database.
1const coupon = await this.couponsDao.getBy(conversationId, today)
- Add an 'if statement' to check if this coupon is empty using lodash. Place this code the top of our js file ProductOfTheDayService.js:
1const _ = require('lodash')
- Use lodash isEmpty in our 'if statement' like this:
1if(_.isEmpty(coupon)){
- If everything's working correctly, we're now sending a coupon only once every day for conversion id.
You're all done – what next?
Congratulations for making it through the tutorial. Feeling confident after everything you've learned? It's time to take the next step – there's a few ways to get started:
- Browse the App Market: Look for gaps and take inspiration from other available apps
- Plan your app: Starting outlining and preparing to build your own app
- Get to know our API documentation: Find the right APIs and webhooks for your app
- Check out our support site: We've got loads of handy guides and tutorials
- Read the App Market Guidelines: There's a few important things to know about how things work
Was this article helpful?
